


---------------------------------------------------------------------
http://tututoday.com/websites.htm
http://www.etsy.com/shop/TutusChicBoutique?ref=seller_info
History of a tutu and how to make them
http://www.etsy.com/shop/TutusChicBoutique?ref=seller_info
History of a tutu and how to make them
History of the Tutu
 The tutu has been called one of the greatest costuming inventions of all time. It is just that, a brilliant “invention”--unlike any garment otherwise known. Confused about the parts of a tutu and confused about the different tutu types? Well, we’re going to help you make your way through the world of tutus.
“Tutu” is French Baby Talk for Your Bottom!
According to Wikipedia, The word tutu is a corruption of cucu, French baby talk for cul-cul meaning roughly "botty-wotty" (for bottom). Legend has it that the term was first used by commoners who, unlike the wealthy sitting in the upper levels of the ballet theatres, were seated in the lower levels. These commoners would look up at the dancer and had a very different view of the ballet. “Tutu” refers to the area seen under the ballerinas’ skirts. The derivation of the name not nearly as elegant, beautiful and romantic as the garment itself!
Anatomy of a Tutu
Before we look at the different tutu styles, let’s get the “anatomy” straight.
 A tutu presents major construction challenges:
- The tutu must be beautiful—yet durable.
- The tutu must fit like a glove—yet allow a full range of freedom in movement.
So, some really brilliant costumers developed a way to piece together different elements to overcome both of these challenges.
Bodice
The tutu bodice can use from 6 to 15 panels of fabric. Some of these pieces are cut on the bias (the diagonal) which gives fabric some stretch. The bodice is a separate piece of the costume attached at the waistline or high on the hip; sometimes it's put together just with elastic tabs to allow for movement.
The tutu bodice can use from 6 to 15 panels of fabric. Some of these pieces are cut on the bias (the diagonal) which gives fabric some stretch. The bodice is a separate piece of the costume attached at the waistline or high on the hip; sometimes it's put together just with elastic tabs to allow for movement.
The Basque
This is the piece that sits from the waist to high on the hip. It can be continuous with the bodice or a separate, tight fitting fabric “band.”
This is the piece that sits from the waist to high on the hip. It can be continuous with the bodice or a separate, tight fitting fabric “band.”
The Skirt
Tutu skirts determine the shape of the tutu and generally define the style: Romantic, Classical or Bell. These different tutu styles will be explained in the next section.
Tutu skirts determine the shape of the tutu and generally define the style: Romantic, Classical or Bell. These different tutu styles will be explained in the next section.
 |
 |
 |
 |
Tutu Styles
The Romantic Tutu
The first tutu is credited as appearing in Paris in 1832 on Marie Taglioni in La Sylphide. Her skirt (see right) was cut above the ankle to show her famous legwork. This first tutu style was dubbed, "The Romantic Tutu”.This romantic style occurred during the “Romantic” period in ballet history.
Romantic Tutus are long, floating and ethereal. They are usually 3 – 5 layers of soft tulle.
There are 2 types of Romantic Tutu. In the first type of Romantic Tutu, the skirt begins at the waist. The second type of Romantic Tutu is a dropped waist version. The skirt begins at the high hip and is called a Romantic Tutu with Basque.
The Classical Tutu
Historically, after the Romantic Tutu, came the Classical Tutu. The Classical Tutu was born from the viewers’ request to see more of the intricate movements that dancers were starting to perform. The Classical Tutu jutted out horizontally from the dancer’s hips and showed more of the leg. This style of tutu was first worn by the Italian ballerina Virginia Zucci in the 1880s. This first “Classical” style tutu ended just above the ballerina’s knees and looked more like the current “Bell” or even “Romantic” style of tutu.
As the years went by the Classical Tutu shrank to show more and more of the feet and legs. Today, there are two main styles of what is known as the “Classical” Tutu: the very flat Pancake / Platter / Plate or Russian design (this tutu goes by many different names!) and the softerPowderpuff or “Balanchine” style of Classical Tutu.
The skirt ruffles on Classical Tutus are placed on a panty.The pancake style Classical Tutu has a wide, flat skirt, is hooped, and is tightly tacked. It is made of stiff tutu netting.
Hooping is stiff petticoat wire inserted into a casing in one of the central ruffle rows. Hooping aids in keeping the tutu’s flat, stiff shape.

Powderpuff Classical Tutu
The “Powderpuff” style of Classical Tutu has a softer look. It is not hooped, has a shorter skirt and is tacked more loosely. It can be made of softer tulle (like the romantics) or a combination of net and tulle. (photo credit: Symphony In C Tutu, From Bentley, Toni, Costumes by Karinska, 1995, Harry N. Abrams, Inc, p. 104.)
Bell Tutu
Another tutu fashion is the Bell Tutu. The Bell Tutu is named for its bell like shaping and is combines features of the Romantic and Classical tutu. The Bell Tutu has shorter, more numerous skirt layers than the Romantic and longer and less numerous skirt layers than the Classical Tutu. The Bell has no hoop and is very loosely tacked. It can be made of softer tulle like the Romantic or net like the Classical or a combination of both. Like the Classical Tutu, it has ruffles that are stitched onto a panty.
Final Thoughts
In spite of the fact that the tutu has just a few pieces, the shaping, lines and combinations of fabrics and colors are endless. Hopefully, this information will help you to plan the tutu of your dreams, and at Class Act Tutu we are always here to help.
-----------------------------------------------------------------------
Here is a link to a youtube. It will show you a thorough tutorial on how to make a romantic tutu.
Part 1 www.youtube.com/watch?v=IJLKzZHTX60 Part 2 www.youtube.com/watch?v=M7RksXK8EdU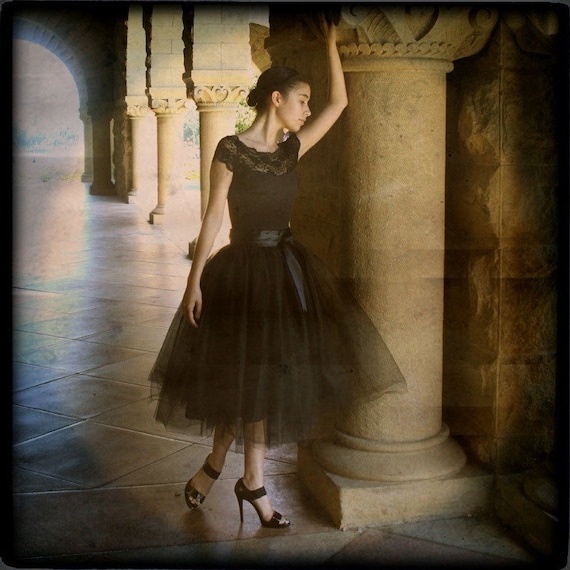 Image from TutusChicBoutique
-----------------------------------------------------------------------
How to make a classical french tutu
The Nutcracker - Making of Tutus
http://www.youtube.com/watch?v=_VkXM7Rc-0g
Creating Classical Tutus for Pittsburgh Ballet Theatre's Swan Lake
http://www.youtube.com/watch?v=4vv9pmAzl7A
Pleating a tutu
How to make a classical french tutu
The Nutcracker - Making of Tutus
http://www.youtube.com/watch?v=_VkXM7Rc-0gCreating Classical Tutus for Pittsburgh Ballet Theatre's Swan Lake
http://www.youtube.com/watch?v=4vv9pmAzl7APleating a tutu
Introduction
I got my instructions out of a very old ballet book and to start with they didn’t make much sense to me. At first I thought part of the tutu pattern must be missing because I was expecting to see a large circular curvy shape to cut the net tulle to. This is the key - the tutu net skirt pattern starts off as a simple long rectangle, the curve of the tutu only forms as you gather one of the long edges.
So, imagine you take a very long strip of net tulle and run a thread along one of its long edges with a loose running stitch (by hand). Then when this is done tie off one end of the thread to the corner, then pull the net tulle down toward it so it forms very tight gathers. As you tighten the gathers, the rectangle shape starts to curl into a curve. Then join the ends of the curve together to form the complete circle. This basically forms one tutu frill layer. Each rectangle has to gather down from immensely long to just your hip measurement. eg, to use some real figures.. Each of my frill layers are 224 inches long and were gathered right down to my hip measurement of 36 inches. (I say hip measurement because a tutu should really sit at the hip, not at the waist).
Now, once you get that bit the next thing to explain is there are multiple frill layers which make up the tutu skirt. The pattern called for 12 frill layers, but that includes the tiny frills. I only did 4 frill layers for my tutu, and that seemed plenty. Each layer you go down the frill reduces its radius by one inch. The top frill layer is obviously the widest part of the tutu. I made mine so it sticks out from my body by roughly 15 inches all around.
So the measurements to make my frill layers were
Top frill layer : 15 inches deep x 224 inches long.
2nd layer : 14 inches deep x 224 inches long.
3rd layer : 13 inches deep x 224 inches long.
Bottom layer : 12 inches deep x 224 inches long.
Top frill layer : 15 inches deep x 224 inches long.
2nd layer : 14 inches deep x 224 inches long.
3rd layer : 13 inches deep x 224 inches long.
Bottom layer : 12 inches deep x 224 inches long.
Materials
- 6 Metres of Net Tulle (off a standard 56 inch roll ) - makes 4 frill layers
- 4 metres of 1 inch bias tape
- 4 inches of wide elastic
Step 1 - Once you have your material you can start on the first layer by cutting four narrow strips of net tulle.

Step 2 - Now join these four strips together end to end so they form a long, narrow piece of net tulle.

I made my joins quickly by laying two pieces on top of each other and running them through the sewing machine on zig-zag stitch.

Step 3 - Take a strong thread (like embroidery thread) and loosely make a running stitch along one of the long edges by hand.


Step 4 - Tie one end of the long thread off securely to a corner and pull the net tulle down the thread, gathering it at the tied end. It takes a lot of pressure to keep the fabric tightly gathered, so a strong thread is essential! When it is gathered down to your hip/waist measurement tie the other end off securely.

Step 5 - That is how the frill layers are formed, but obviously if you let go of the cotton thread the gathers will just spring out. To hold the gathers in place more securely I then machine sewed them onto a piece of bias tape.

Step 6 - The open ends of the frill layer are brought together to form the complete circle when it is attached around the knickers. In a classical ballet costume the outer briefs form part of the tutu (called tutu knickers on my pattern). The knickers-basque-waistband ensemble looks like a pair of very high waisted control knickers.
Ordinarily the skirt frill layers are fixed onto the tutu knickers. That’s why a tutu skirt sits on the hips not at the waist.
Ordinarily the skirt frill layers are fixed onto the tutu knickers. That’s why a tutu skirt sits on the hips not at the waist.
But for two reasons I fixed my tutu frills onto a separate stiff band, which I made out of spare folded over net tulle.
Reason 1: This was so I could slip the tutu skirt up to my hips and off again without removing the whole costume.
Reason 2: My costume fabric was thin and stretchy so I guessed the weight of all the frills would have stretched it out of shape.
Reason 1: This was so I could slip the tutu skirt up to my hips and off again without removing the whole costume.
Reason 2: My costume fabric was thin and stretchy so I guessed the weight of all the frills would have stretched it out of shape.
The wide band I made for the net frills to attach onto is approx 2.5 inches wide, enough room for the 4 frill layers to fix onto.

Another construction detail about attaching the frill layers from the book – this is important for the strength of the tutu (so it can stick out and defy gravity!) - When you attach the frill layers onto the knickers, (or onto the frill band in my case), they should be fixed on as the diagram below shows, so the frill layers get maximum support from the seams and other frill seam allowances.

Step 7 - Move on to make the second frill layer. This will be similar except it will start off as 224 inches by 14 inches, the third layer 224 inches by 13 inches and the fourth layer 224 inches by 12 inches.
When you have sewn all the frill layers onto the knickers (or frill band) the whole thing gets pretty unwieldy. It was quite a struggle to actually get it all through the sewing machine..
The tutu at this stage will resemble a huge unruly puffball (pic shows tutu upside down at this stage).
When you have sewn all the frill layers onto the knickers (or frill band) the whole thing gets pretty unwieldy. It was quite a struggle to actually get it all through the sewing machine..
The tutu at this stage will resemble a huge unruly puffball (pic shows tutu upside down at this stage).

Step 8 - So, the final thing to do is lay the tutu down on a flat surface and gently squash the frill layers together to form the neat pancake tutu shape, then sew large looped stitches through to hold the 4 layers together permanently. You can put a hoop in between layers at this stage too if you want. I didn’t bother using a hoop for mine because it seemed to have enough strength without it (pic shows tutu right side up after the frill layers had been sewn together).

Step 9 - And there you have it; my finished tutu. All that remains is to make and fit the decorative top skirt, which covers about 12 inches of the 15 inch net skirt.
Here are the parts of my costume laid out, including the top skirt on the right just before it was attached onto the knickers.

Step 10 - The main reason I made my net skirt fixed onto a separate band instead of properly onto the costume knickers is so I could remove the net skirt easily without taking the whole costume off. The top decorative skirt of my tutu is fixed on top of my basque/knickers seam line. When I slide the net tutu down and take it off, my top skirt then just flops down and looks like a ballet rehearsal skirt. This is all for better cosplay ease, eg Loo breaks whilst in costume.

Because I made my net tutu to slide off I found I needed to add soft fabric lining inside the tutu band and underneath to protect my tights from the netting - the coarse net can easily ladder a good pair of tights! So here is the net skirt after I added the protective lining inside the band and underneath..


Storage - Tutus are BIG, and present a bit of a storage problem. Here is how I store mine. Just a ribbon looped around and hung from a coat hanger.

-----------------------------------------------------------------------
How to Make a Tutu Dress: What I'm Making Monday
Before Lil' J was born I already had about six tutus and three tutu dresses made for her. I posted a tutu making tutorialalready, but tutu dresses are even more fun, especially for little babies and in my opinion, they're easier to make!
I didn't want to pay $40+ on something I could make for $5 so I learned how to make them myself.
I was making one for my friend While Sol Sleeps, so I took photographs along the way to show you how it's done.
 First, what you'll need is tulle, a crocheted tube top (which can be made of you cut the tie at the end of a big beanie, or you can buy 6in crocheted headbands here), tulle, sissors, and whatever embellishments you want: flowers, ribbon, etc.
1. Cut the tulle in lengths that you like. I buy my tulle by the roll at Hobby Lobby. It's rolled up 6in wide which is perfect for tutus. Then I cut the strips 20in long since it'll be folded in half and become a 10in tutu.
 2. Fold a tulle strip in half, and push the hoop part through a bottom crochet hole in the tutu top.
 3. Pull the other end of the tulle through the loop to make a easy knot, pull it tight.
 4. Repeat all the way around the crocheted top.
 5. Add the flower, and ribbon embellishments to finish it off. I make the flower detachable on a silver hair clip so it can be a hairbow, or clip onto the dress!
What do you think? Don't think you can make one? Ourlittletutus.com sells cute tutu dresses for an affordable price!
Also, I'll give away a small pink and black tutu dress to a commenter who comments on this post before November 1st. Lil' J wore it once to model for this picture, then out grew it!
 If you want an extra entry (or just feel like showing off your creation), participate in What I'm Making Monday. Link up your What I'm Making post!
(I'm still getting used to this Linky thing, so bare with me while I try to figur this stuff out!)
I didn't want to pay $40+ on something I could make for $5 so I learned how to make them myself.
I was making one for my friend While Sol Sleeps, so I took photographs along the way to show you how it's done.

1. Cut the tulle in lengths that you like. I buy my tulle by the roll at Hobby Lobby. It's rolled up 6in wide which is perfect for tutus. Then I cut the strips 20in long since it'll be folded in half and become a 10in tutu.


What do you think? Don't think you can make one? Ourlittletutus.com sells cute tutu dresses for an affordable price!
Also, I'll give away a small pink and black tutu dress to a commenter who comments on this post before November 1st. Lil' J wore it once to model for this picture, then out grew it!
(I'm still getting used to this Linky thing, so bare with me while I try to figur this stuff out!)
-----------------------------------------------------------------------
Full and Fluffy Pettiskirt
All Baby Legs are 50% off at My Bonita Boutique. Stock up in all sorts of colors and designs. Especially because the cooler months will be here soon. Click here for the full selection.. . . . . . . . . . . . . . . . . . . . . .I used to love to dance around in skirts as a young girl.And I always wanted a pettiskirt.My childhood friend had one, and we would wear it, then trade, then dance, then trade, etc.What a pain…….but I loved that thing.And wished it was mine.So making my little girl her own, was kind of like fulfilling that childhood dream of having a full and fluffy pettiskirt, all my own. Ha……forgive me!What could be better? A full pettiskirt to dance in, twirl in, pretend in…… All of the ruffles, all of the layers………they will bounce right along with your free-spirited little girl.
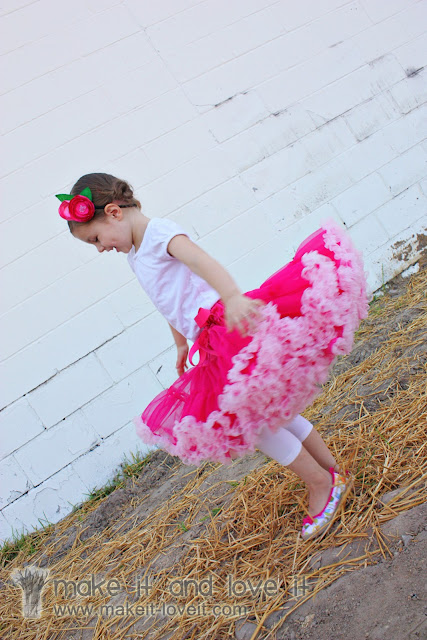 With all those soft layers, girls of all ages are bound to feel happy and free….
 Made my heart so happy to watch this little lady enjoying the fullness and fluff, every bit as much as I did so many years ago. (Why didn’t I know now to sew when I was a teeny little girl?)
 Would you like to make one too?I found a video on Martha Stewart here a while ago, where a guest came on and showed how to make her pettiskirts.I wish she had more time to share….but such are TV segments. Short and sweet.So I watched the video several times, adjusted the measurements given (just a bit), and came up with a step-by-step tutorial…..just to help explain the process a bit more.And before we begin, make sure you purchase a non-fray chiffon….you don’t want to have to finish off every edge. WAY too much work. I found my chiffon here. And actually purchased rolls of it, in the exact width that I needed, here. There are many colors to choose from and the prices are great! (If you don’t buy it on rolls, get ready to make lots of 2 inch and 5 inch wide strips that have to be sewn together to make longer strips. But it can be done…..don’t worry!)If you’re making a size similar to mine (about a 3T/4T….maybe even big enough for a 5T) I followed the links above and purchased one 2 inch roll (light pink) that was 60 yards long and one 5 inch roll (bright pink) that was 30 yards long.Also, you will need to purchase a 1/4 yard of satin, some 7/8 wide elastic, and some ribbon.Now, to get a visual of how the skirt is made……..it is a 3 tiered skirt, with a ruffle around the bottom. The 1st tier is satin, the 2nd and 3rd tiers are 5 inch wide chiffon, and then you use the 2 inch wide chiffon as a ruffle along the bottom. And then you actually make the chiffon section of the skirt twice, and put them together and make a 2 layered, 3 tiered skirt. Make sense?So first, I measured and cut enough strips of chiffon to make the two separate skirts.The hot pink layers are 5 inches wide (though they look a little scrunched) and the pink layers are 2 inches wide.The top chiffon tier is 180 inches (5 yards) long, the 2nd chiffon tier is 360 inches (10 yards), and the bottom ruffle is 1080 inches (30 yards). Then do that twice……so you can make the 2 separate skirts.
 Then, I learned a little trick on my Bernina to help the process (because I don’t have a ruffler foot but may invest in one after making this pettiskirt). I adjusted the stitch length to the longest it would go…….
 And then adjusted the tension wheel so that one thread was being pulled tighter than the other…….creating a ruffle in the fabric. And then I tried it on my old machine……and it worked great too. (So increase your stitch length like you normally would to create a ruffle, but then play around with your tension on some scrap fabric and watch as it ruffles your fabric. Don’t backstitch at either end, and then you can still adjust the ruffle by increasing or decreasing the ruffle.) Great, right? It saved some time.
 After you have practiced this technique on some scraps, stitch down the center of your 2 inch wide fabric, creating a nice ruffle. See all of those ruffles? That’s how ruffly the machine made the strip without me even trying.
 But if you don’t like that technique, you can always sew a basting stitch and then do all of the ruffling on your own. (Need help? Visit this post here.) Or you can just gather with your fingers and slide it under the needle as you sew.
  But this way, you can’t adjust the length of the ruffle when you’re done.Whatever you’re most comfortable with. But get ready, you have 2 really long strips to ruffle.Now, lay your ruffle down next to one of your 360 inch long layers. (The second 5 inch chiffon layer.) You want the ruffle to be the same length as this layer……so pull on the end thread of your ruffle to adjust or release the ruffle a bit.
 Then sew the 2 short ends of your 5 inch wide layer together, making a large circle. Also, be sure that the fabric is not twisted at all. Then attach the ruffle to right side of the bottom edge of this layer, attaching the ruffle about 1/4 inch up from the bottom. And sew right down the center of the ruffle.
 And when you get back to the beginning, just overlap the ruffle just a bit and backstitch several times.
 The whole layer, with the ruffle along the bottom.
 Next, you’re going to sew a basting stitch around the top of this bottom layer, a 1/4 inch from the edge…..so that you can gather it before attaching it to the next layer up. I split this in half and sewed a basting stitch only along half of the top, stopped, left long thread ends…….and then made another basting stitch around the other half of the top. This way, I could gather half of the top edge at a time. And I used the same technique that I shared above, and adjusted the tension. Then I didn’t have to gather as much…Then grab the 180 inch long layer of chiffon and sew the ends together the same way as you did the longer layer……….and lay the two layers down next to each other.
 Place the two layers together, with right sides together. And adjust the gathering if you need to so that there is an even ruffle all the way around. Pin the layers together.
 All pinned along one side, ready to pin the other half.
 Then sew the two layers together, right along that original basting stitch, about 1/4 inch seam allowance. (Maybe a 1/3 inch seam allowance to hide some of the basting stitch.)
 Do the same thing with the other layers you have cut, attaching the ruffles and creating gathers. So now you have 2 identical pieces……….each with 2 tiers and the bottom ruffles. Whew, lots of gathering.
 Next, you’re going to cut a piece of satin that is 8 inches wide by 40 inches long.
 On the wrong side of the fabric, iron on a piece of fusible interfacing that is 1/2 x 40 inches to each long edge of the satin.
 Then sew the piece of satin together into a tube with right sides together. Use a 1/2 inch seam allowance to sew those 2 ends together. Then sew another seam, just to reinforce…..or zig-zag. Whatever you’d like.
 But be sure to leave an opening along the edge that is 1 inch wide. This satin is 8 inches wide and will be folded in half to make the waist band. So I measured in 4 inches, placed a pin, measured over an inch to the left, placed another pin, then made my seam……..but left the space between the two pins open. Then made the next seam the same way, leaving the 1 inch space open.
 The I folded the fabric down on itself in half, making a waistband, and making sure that the 1 inch opening was on the outside. So this is a tube below, with a fold at the top and the raw edges at the bottom.
 Then I ironed that top fold in place. Then I measured down an inch from the top, all the way around the tube and put pins in as my markers. (You could use chalk too.)
 Then I followed the pins as I made a seam all the way around the tube….creating a casing for the elastic.
 Then I cut a piece of elastic that was 6 inches shorter than I needed. My little girls waist is about 20 inches, so I cut a piece of elastic that was 14 inches and 2 piece of ribbon that were 18 inches each. Then I heat sealed the ends of the ribbon (with a lighter) and then sewed one end of each piece of ribbon to each end of the elastic. Now the waistband is adjustable with a ribbon, yet allows for a snug fit from the elastic.
 Then attach a safety pin to one end and slide the ribbon through the casing of the satin piece.
 Pull all the way through, gather in the fabric, tie in a bow…….see how it works?
 ***And see how there is an outside layer and an inside layer to the waistband?Now, untie the ribbon and just pin the ends to the skirt so that they’re not in the way during the next step. Or just don’t even put the ribbon in until later.Now, grab one of your ruffled layers and make a basting stitch along the top (1/4 inch seam allowance), just like you did above. And make two separate basting stitches, halfway around each, like I explained above………it helps while you’re pinning.Now pin this layer to the bottom front edge of the satin waistband……with right sides together. But only pin to the outer layer of the waistband. Make sure the inner layer of the waistband is out of the way. Adjust the gathering where necessary and make sure that the gathers are evenly distributed around the satin layer.
 Then sew into place, using a 1/4 – 1/3 inch seam allowance. When you flip down the ruffled layer…….you will now start to see your skirt.
 Now, gather the top of your other skirt layer the same way as the first one. Turn the skirt and waist band inside out so that the other layer of the waistband is on the outside.
  Now pin the wrong side of the chiffon layer to the right side of the satin layer……and pin in place.
 Pin all the way around.
 And sew into place, just like above.Now, sew a top-stitch along the bottom edge of the satin, folding the raw edges (that are underneath) upwards, towards the top of the skirt, as you sew. You will be sewing through the top layer of satin and then the little raw edge underneath as well. So two layers of satin and some chiffon too. Do this to both edges of the satin.
 See the top-stitch along each edge of satin that is next to the chiffon? (The seam in the middle is just the casing for the elastic.)
 Are you still with me? That’s it. You’re done. No more gathers or ruffling. Whew.Great work!Now, really, wasn’t that all worth it?Just look at all of that pettiskirt goodness…..………secured in place by a sweet little ribbon on the hip.


http://www.makeit-loveit.com/2010/07/full-and-fluffy-pettiskirt.html
-----------------------------------------------------------------------
FEB
18TH
2010-----------------------------------------------------------------------
18TH
2010-----------------------------------------------------------------------
I came up with these flowers one day when I was in a crafty mood and now I’m completely obsessed with them. I wear them in different colors nearly every day… it’s kind of a problem.
A few things to note:
- I used an alligator clip for the back, but feel free to replace with any other types of bobby pins/clips you have handy. Or use a pin-back to make a cute brooch! Oooooh, I like the way I think.
- With these flowers I used a lightweight, silky fabric. Do you love how specific I am? Haha, I really am no expert, just make sure not to get too heavy of material because the edges will just burn and turn brown on you.
- When singeing the fabric, BE FREAKING CAREFUL. I’ve burned fingers, clothes, and my bangs. You don’t actually have to touch the flame to the fabric to singe it and make it curl up, and you can easily catch the entire thing on fire.
- Also, there’s no rhyme or reason to the size or shapes of the flower petals. Mine turned out to be about 2.5 inches wide, but do what you want!


Experiment with different colors, fabrics and beads for the center. Have fun with it & please let me know if you made one!
-----------------------------------------------------------------------
Today I'm going to show you how to make a Reversible Juice Pouch Headband!!

Pretty cute, huh? My girls love wearing these, and we always get compliments on them when we're out and about! Alright, let's get started!!
{Juice Pouch Headband Tutorial}
Supplies Needed:
* 4 juice pouches, cleaned and dried
* Fabric
* Tape
* Sewing Machine
* Coordinating Thread
* about 4" of Elastic
* Headband Template (I just found one online that I liked...HERE)
{Step 1} To get started, let me first show you how I clean out my juice pouches. All I do is carefully cut a slit in the bottom, wash out in soapy water, and let air dry. Sometimes if I want to speed up the drying process, I'll put the juice pouches in the dryer on low.

{Step 2} Next you'll need to carefully cut off the back of the juice pouch. Using an Exacto-Knife, start cutting on the bottom of the pouch, where you cut the slit to clean it out. Keep going until you've cut the whole back of it off.

This will give you a better idea of what it should look like. The pouch on the left has the back cut off....the one on the right doesn't.

{Step 3} Sew the pouches together. I like to use a zig-zag stitch, but you can use a straight stitch if you prefer.

{Step 4} Fold the pouches in half, and tape your headband template on top. Cut around the template.
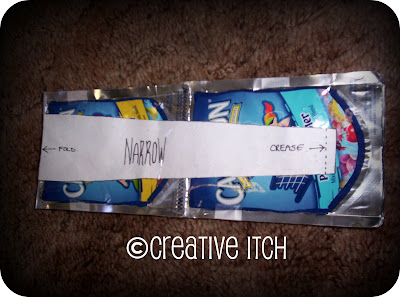
Here's what mine looked like after cutting.

{Step 5} Fold both your fabric and headband in half. Place juice pouch headband on the fold of the fabric. Cut out leaving about a 1/2" border.

**Tip: I put tape on the inside of the juice pouches to keep them in place while cutting out the fabric.

{Step 6} Unfold the juice pouches and fabric, and place the juice pouches in the center of the fabric, right side up. The fabric needs to be right side down.

{Step 7} Fold fabric to edge of juice pouch, then fold again.

Tape in place.

Here's mine all taped down.

{Step 8} Sew along the inside edge of fabric, right over the tape. I used a straight stitch. DO NOT sew the ends closed!! Once you're done with both sides, carefully peel off the tape. After the tape is all off, iron the fabric flat using low heat.

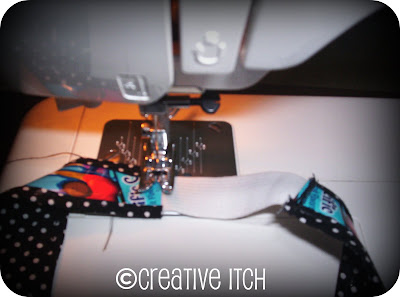
{Step 9} Sew your elastic in one end, backstitching to secure.

Then do the same with the other end. Make sure you back stitch a few times!
And that's it!! You're all done! Now put on your cute headband and admire your work!!


-----------------------------------------------------------------------


-----------------------------------------------------------------------
Designer Baby Burp Cloths
September 18, 2010 by Shelley
I must tell you I don’t really know how to sew. There. I said it. Somehow I’ve tricked all my friends in to thinking I do. The reality of it is, I only attempt to sew things that require no pattern and that are square. They must be square! Small blankets, pillowcases, beanbags, and burp cloths. I dream of being an amazing seamstress someday, but in the meantime thank goodness for gorgeous Fabric that makes all of my ‘square’ sewing projects look adorable.
It seems I always have a baby shower to go to, so I love keeping a stock of these adorable gifts on hand. I sew up several sets in one day and then have months of baby gifts ready to go. These gorgeous gifts end up being a mere few dollars a set {shhhh, don’t tell your friends}! Handmade gifts are always the most cherished and did I mention they make you look ultra talented?
Now I don’t care who you are, you can sew a square. These look adorable because, well, the Fabric is adorable. Amy Butler has fabric that is pure eye candy. Heather Bailey’spatterns are another one of my favorites. My favorite place to buy gorgeous fabrics like these at wholesale prices is from Fabric.com. {Unfortunately you can NOT find these designer lines of fabric and JoAnn’s or similar stores. Your local quilting shop may have some}.
Here are the incredibly easy and basic instructions:
-Get your hands on some fabric you love. Fabric.com is my choice and they have a great sale going on right now. (I love having fabric on hand to make whatever on a whim) -You will be amazed at how many burp cloths you can make with a yard or two of fabric.
-For the back I used a basic white Chenille {This can be found at JoAnn’s for a great price. Don’t forget your coupons}.
-Cut your square. Whatever size. Mine were technically rectangles…9×14.
-Place the front of the chenille and front of the patterned material together and pin {so it looks inside out}.
-Sew all the way around all four sides, leaving appx 2 inches un-sewn.
-Use the 2″ hole to flip your fabric right sides out.
-Tuck the rough edges of the hole under and hand stitch the hole closed.
-Vwalah! Pair them together and you got an incredibly adorable gift.
 What are your favorite lines of fabric?
-----------------------------------------------------------------------
-----------------------------------------------------------------------
How To: Rolled Fabric Flowers

So I am jumping on the bandwagon and loving all the rolled fabric flowers I've seen here and there. We decided to make some with the girls in our church youth group, but I couldn't find a great tutorial on how to make them so I played around and this is what I came up with.
Enjoy!
Enjoy!

Start with about a 1" ripped strip of fabric (you can use any width...this was the width I liked best). The length and weight of your fabric will dictate the end diameter of your flower.

Fold the strip in half and dot a little fabric glue on the end 1/2" or so.

Roll the glued end a few times to get a nice tight center.

Then, once you have a center you like, start twist/folding your fabric away from the center as you roll.

It will start to look like this. Periodically secure the layers with fabric glue as you go.

Continue rolling until you have a flower that is sized the way you like, but make sure you leave at least a 1" or 2" tail (enough to cover flower bottom).

Spread glue all over the bottom side of the flower.

Then fold tail down to cover glue. Press flat with your fingers.

Then trim off the excess fabric.

Use felt to secure them alone or in groups to make headbands, pins, necklaces, or dare I suggest earrings?
And the upside to letting my hair go back to its --ahem-- more natural darker shade of blond is that I might be able to pull off this color of yellow finally.
Maybe.
-----------------------------------------------------------------------
Tuesday Tutorial: Petals and Pearls Headband

Leather and pearls give this headband the perfect blend of soft and strong. This headband is so elegant and sophisticated. You would never guess that I made it from an old leather purse!
Petals and Pearls Headband
What you will need:
Old Leather purse (to completely rip apart)
Good quality Faux Pearl beads in varied sizes
Elastic Ribbon
Sewing Machine
Hot Glue
Scissors
First take the scissors and start cutting out as much leather as possible.

You should end up with something like this depending on the bag. You could of course use other sources of leather as long as it isn't thick. The leather I used had a fabric backing on it... this made for a nice contrast of color!

(The flower is loosely based off of these) Start Cutting out 3 different squares. One is 1.5 inches. Another is just over 1 inch and the other is just under 1 inch. From there make them into petals that resemble the ones I made These will be your patterns.

Make about 15 petals for each size (using the pattern you just made for each)... I made 10 extras of the largest size and used them to help fill it out... you may have some leftover when you are through.

Glue on the bottom and fold ends together. (sorry bout the blurry pics!!!)

Figure out where everything will go before gluing it all together.

Cut a circle out of the leftover leather and start by gluing the largest layer first then work your way up. Hot glue some pearls in the middle and you are finished with the flower.

Once you are through making the flower cut off the handles to the purse. This will be the band. Measure it to your head and cut. Leave about a 3 inch space for the elastic to go. Attach Elastic with a sewing machine.

Now enjoy your work of art! Simply Stunning!

Now enjoy your work of art! Simply Stunning!

-----------------------------------------------------------------------
Bib Necklace How-to Part 1
So hey, go and check out Bird Crafts and see if
you notice anything familiar! Thanks Bird for the shout out!
Okay on to the necklace...

Okay everyone, here is my lovely self in my bib necklace...I don't know why I seem to be allergic to looking at the camera. I will work on it.
I wore it on a white shirt tucked into a gray pleated swing skirt...just thought I would paint the picture for you. I will say that I took this picture after church so the necklace had been through several bouts of our littlest man climbing all over me. I started the day with it tied a little tighter, so the necklace almost looked like the collar of the white shirt. Okay enough of me in the necklace...on to the tutorial.
The tutorial for this necklace is going to be in parts. I am going to give a tutorial on how to do each flower, and then I will tell you how I put everything together. It might seem annoying to split it up, but believe me you would be more annoyed to have a novel of a tutorial in one post!
Bib Necklace Rolled Flower Tutorial
You will need a light tee shirt for these flowers. Take your tee, cut of the sleeves and the collar. You will want to cut nine 1X16 inch strips...these are just for the flowers, you will need two more for the necklace tie.

Roll each of your strips, tight like this.

Start at one end, leaving about an inch of the end.

Here is where it gets tricky to explain...While clasping the end, roll the strip tighter.

Start rolling.

After rolling around a couple of times, put a drop of hot glue on the inch piece you left on the end.

Fold over your started rosette on the drop of glue. The piece of extra fabric you glued it to will act as a stabilizer as you continue to roll your flower.

Continue to roll the rest of your strip. Use glue on stabilizer as needed to make sure the flower stays together.

Roll until there is about an inch left of your strip. Place a drop of glue on that left over flower, and then fold over onto the back of the flower...again to stabilize the flower.

One flower done...eight more to go.
This flower (and the smaller version) is next...

but you will have to wait until Saturday...maybe Monday for this one. I am going CAMPING....yep that is right. I am going with the young women of our church to girls camp for the rest of the week.
Don't worry I am not forgetting Recipe Thursday...there is something all ready to go. PLUS I am doing a blog swap on Friday...so I will still vicariously be here even if I am up to my stink in camping.
BUT when I get back on Saturday I am probably going to be spending my time with my sweet hubby and little men, of course after showering for an hour and washing all my campfire perfumed clothing, so don't cry your eyes out when I don't do the next part of this tutorial until Monday.
Sorry about saying yesterday that a recipe was coming today...
I told you my brain was FRIED. I seriously thought all day yesterday
that today was Thursday. Recipe will be on its regular day TOMORROW.
So I have made you all wait long enough! Thanks for your patience. My Littlest Man is still under the weather BUT at least he is sleeping a little better.
I know I originally said I was just going to do the one flower next, but since you all were so nice to wait...here is the whole rest of the tutorial to add to this tutorial. So go and make yourself one of these beauties and get ready for the compliments.

Bib Necklace How-to: Large and Small Felt Flowers
you will need:
white felt
decorative scrapbook brads (or beads)

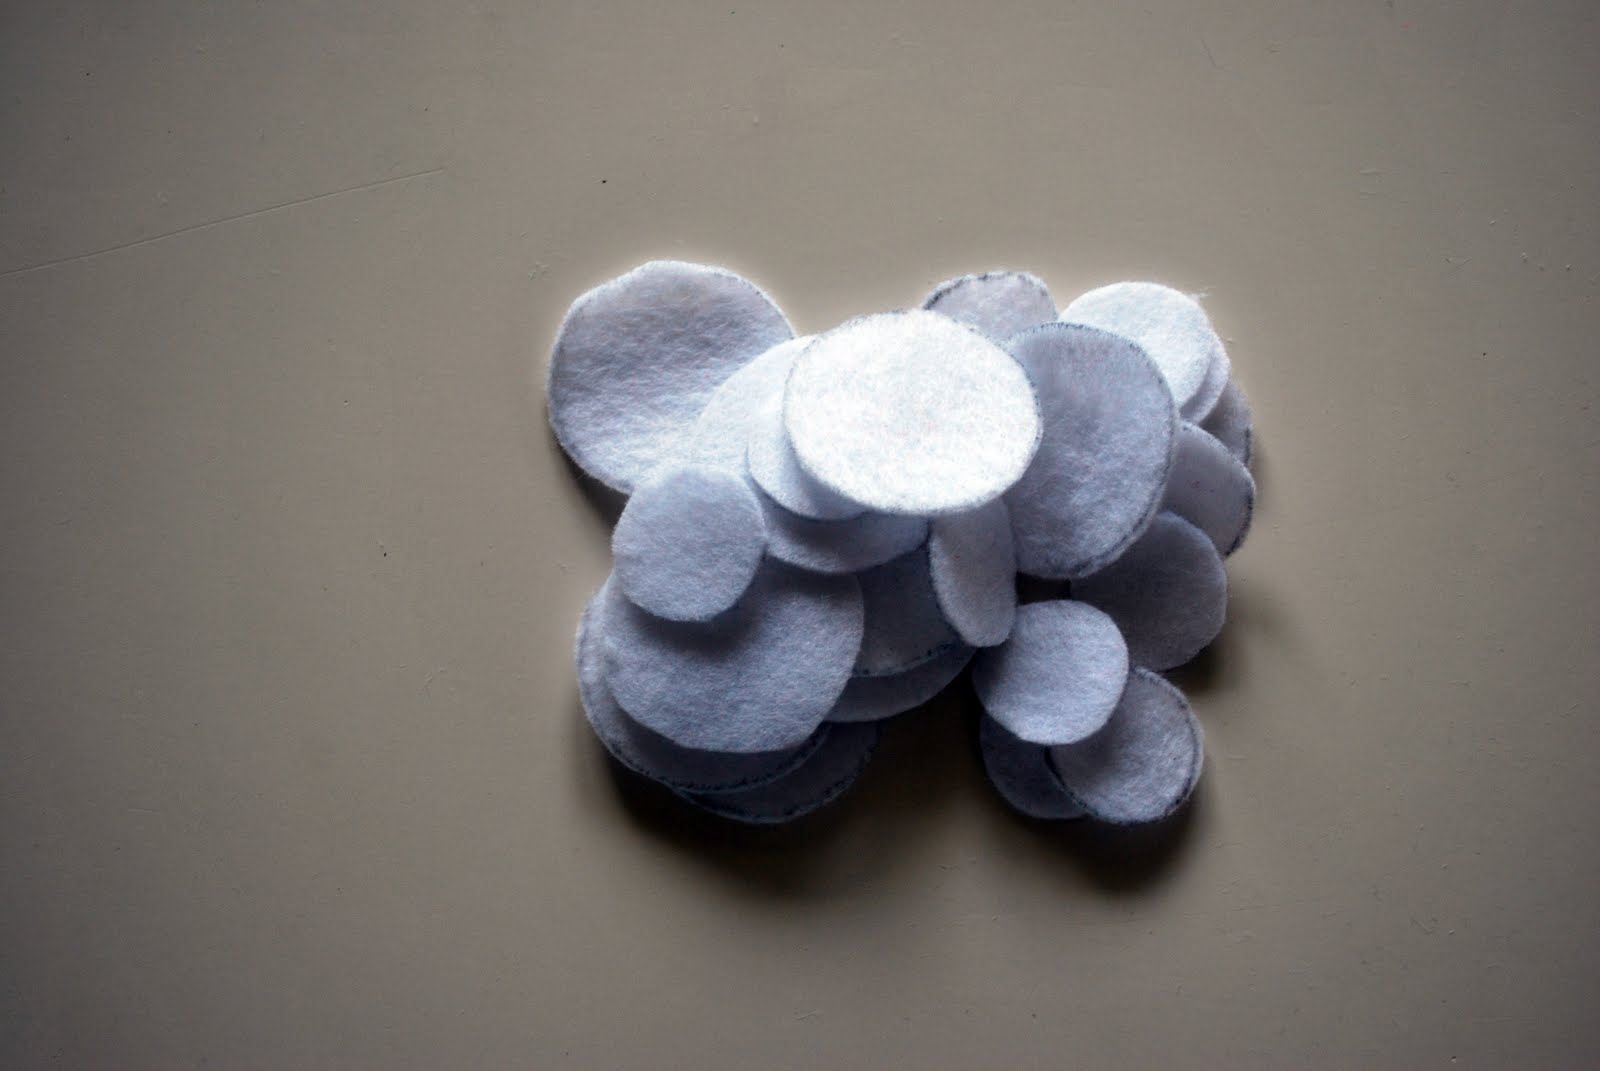
Trace and cut out circles from white felt. Big circles are about 1 1/2" in diameter. Small circles are about 7/8 " in diameter. You will want 6-7 big circles and 8-9 of the small.
Cut all but one small circle in half.
On a scrap of felt, place and glue down 5 of your big half circles like so...

On top of that pattern, arrange and glue down 4 of your big half circles like so...

Arrange and glue 2 of your big half circles like so...

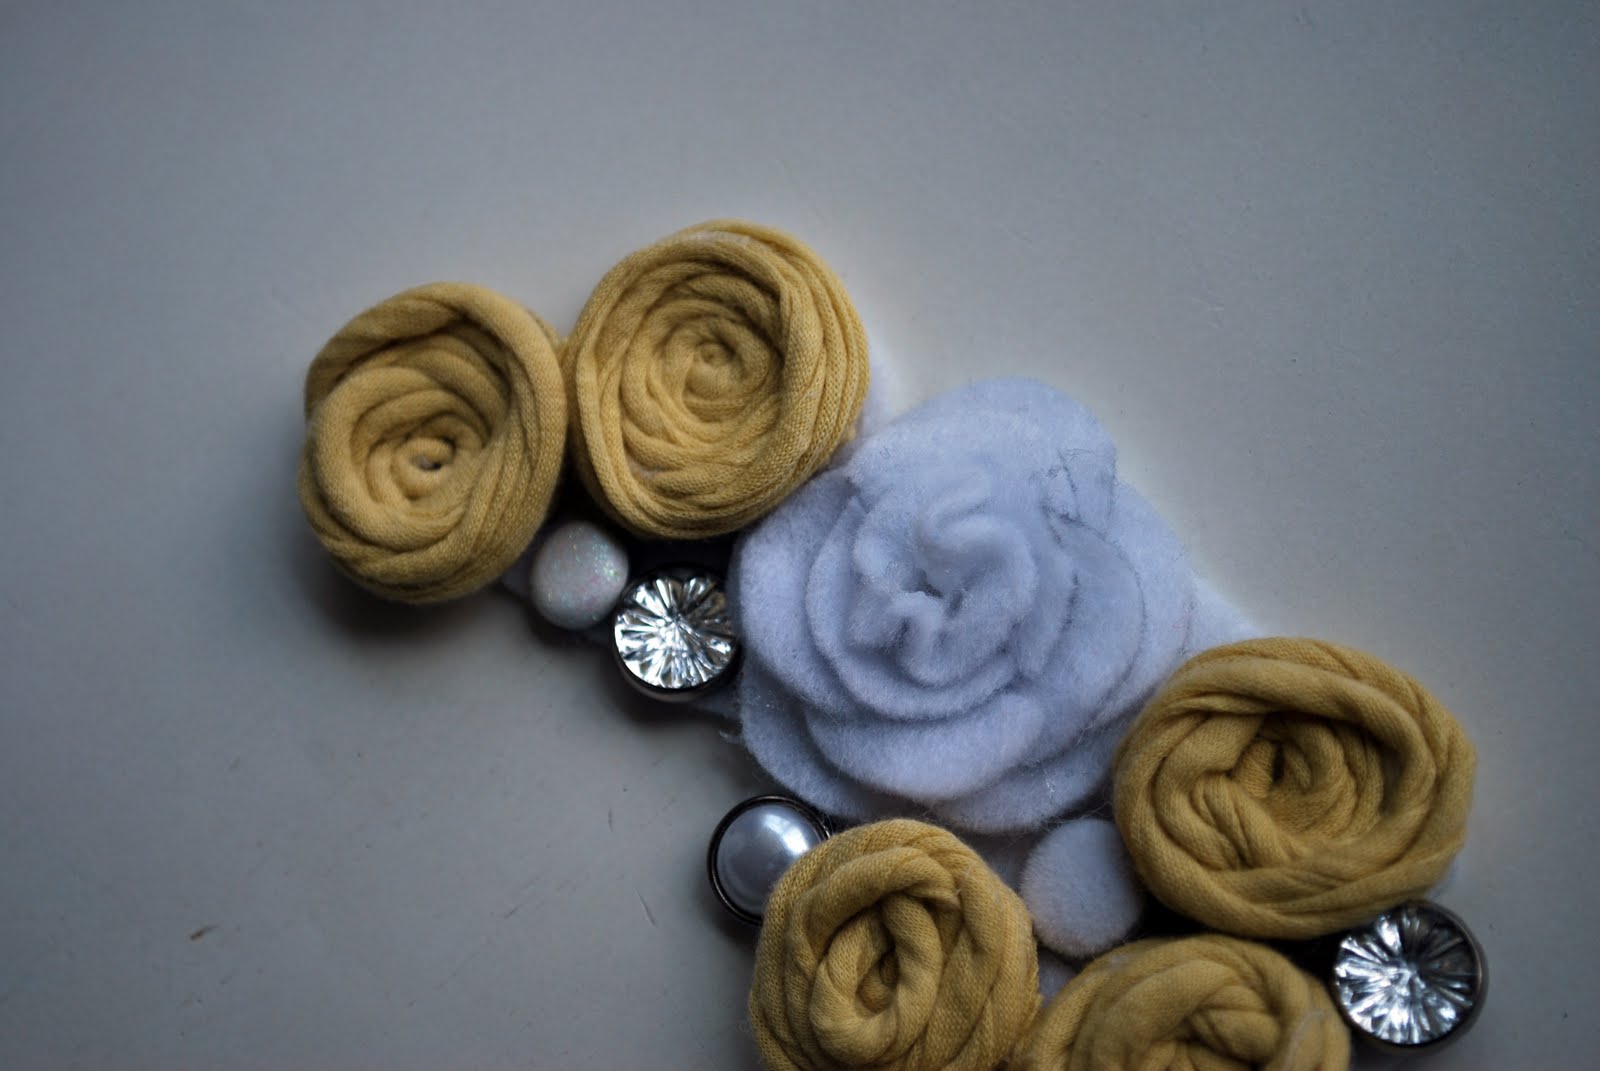
Arrange and glue 3 of your small half circles on top of the two big half circles. After bending the brad tabs back so that they can not be seen from the front, glue the brad in the middle of the flower like so...

Repeat the process with all smaller half circles to create a smaller flower.

Instead of the brad in the middle. Take one intact small circle and glue together like below picture. Then glue it into the middle of your smaller flower.

Cut out both of your flowers so none of the scrap felt shows.
Bib Necklace How-to: Assemble
You will need:
white felt
2 t-shirt strips left over from rosettes in first tutorial
hot glue
decorative scrap brads
completed flowers
Choose which brads you like best (I got these at a local craft store...Hobby Lobby).

On a larger piece of white scrap felt, arrange flowers and brads how you want them to look. Asymmetrical is a really in thing right now, so don't worry about trying to make it even.

Once you have everything arranged how you like it, hot glue all those flowers and brads down.

Cut out so the felt behind does not show.
Fold over the end of each t-shirt strap and glue down in the corners, like so...

Lightly outline your completed necklace front on another piece of felt.

Cut out that piece of felt. Glue to the back of your necklace. This will hide the back and give it more stability.

Hey guess what? You are done. Isn't it lovely? Pretty easy too, huh?

-----------------------------------------------------------------------
Anthropologie Inspired Necklace Tutorial
- Posted by Joy
- Write a comment

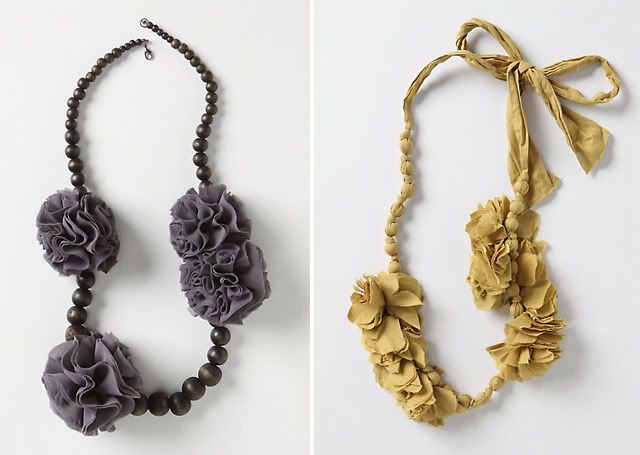
Anthropologie is one of my favorite placer to turn into for inspiration, they don’t just have the most creative awesome and eco-friendly displays, they always have super cute clothes and accessories!
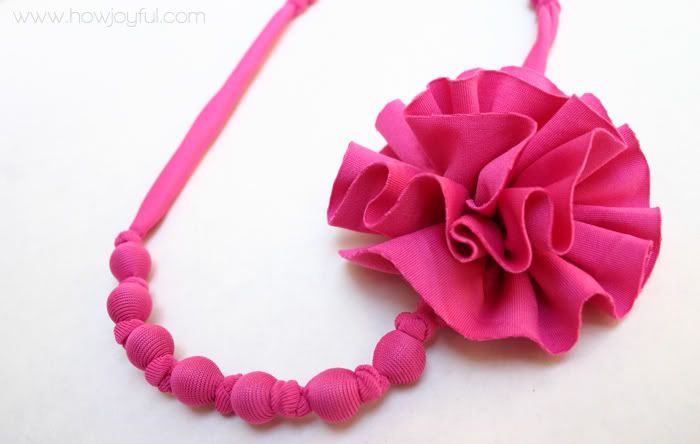
So today I will show you how easy is to make one of this little necklace:
And in case you wondered my inspiration were this wonderful necklaces:
THE PROCESS:
[Click Images to Enlarge]
Note: Try to find the thinest fabric you can to make this because if the knots are just as big as the pearls you loose the effect.
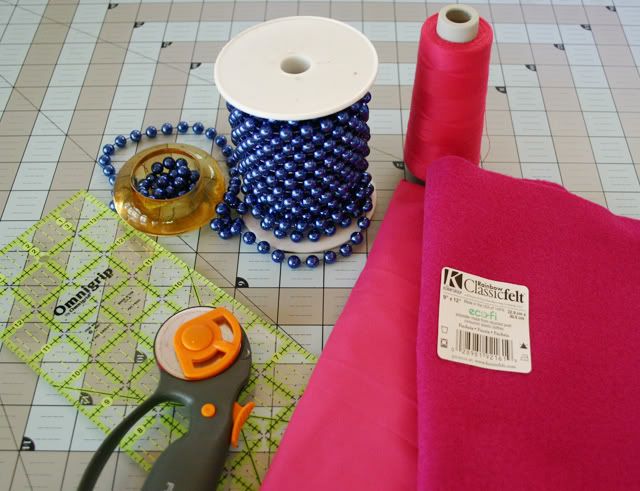 | Materials: - Small piece of felt - Any kind of pearls, I used some old Christmas decoration pearls -Cutting tools -Hot glue gun - Fabric left overs (I used Lycra because it’s stretches good to make a thin knot and I had some decent pieces left from the inside of thebabydoll) |
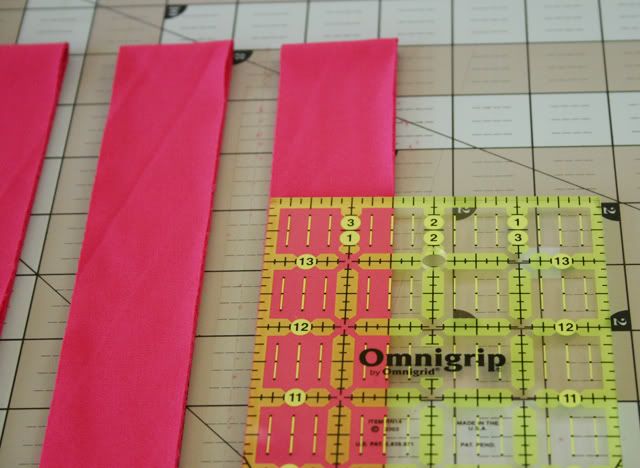 | Cut stripes, mines are 1.5 inches, but it depends on the size of you pearl, try to wrap the pearl in fabric and pin it making sure it goes trough, then leave enough space to sew. |
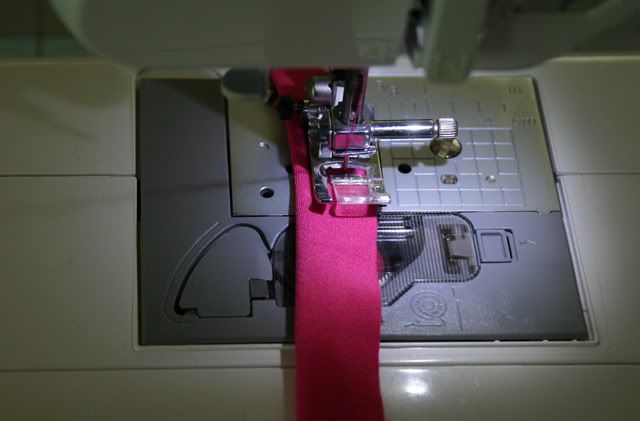 | Fold your stripe of fabric in half and sew. After you finish cut the extra leftover (you need to have the less material possible for the knots) |
 | To turn them inside out I always use a safety pin. 1- secure the end of your strap with the safety pin. 2- turn the front to the inside of your strap. 3- pull trough the inside of your strap. 4- reach the other side and pull the safety pin out. 5- keep until all you turned the whole strap. 6- strap ready |
 | 1- Put one pearl carefully though the end. 2- Make knots in both ends 3-Pass another pearl. 4- Make another knot. Do it for as many as you want! |
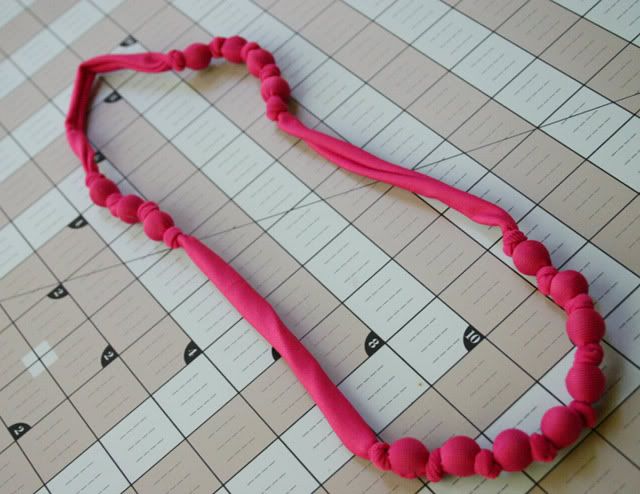 | I didn’t do it all the way around, and leave some spots without pearls, because I want to attach, the flowers. |
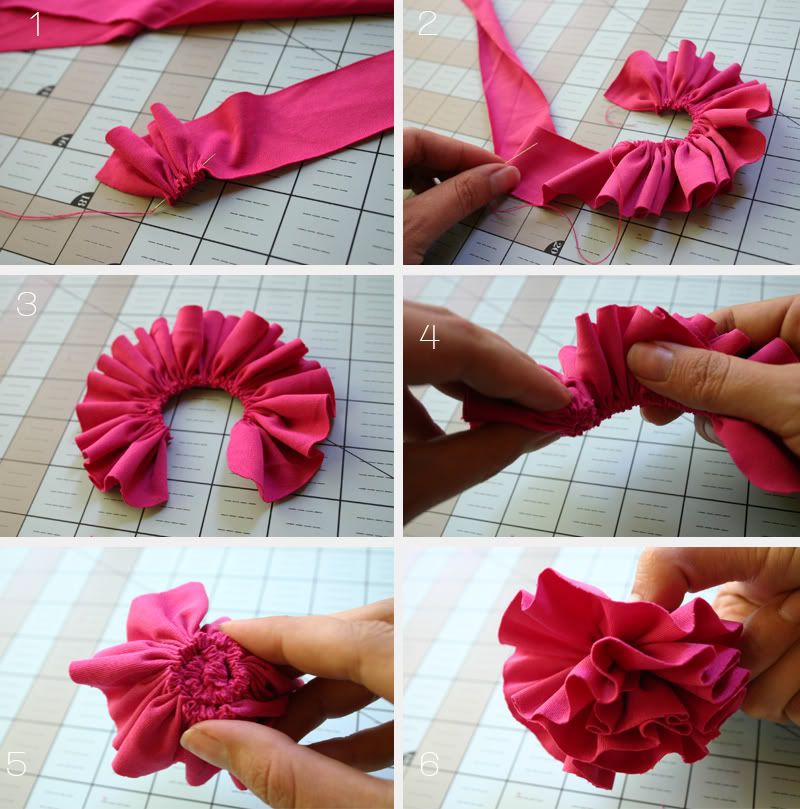 | To make the flower 1- pass a needle in zig-zag thought the edge of your second piece of fabric. 2- secure the beginning and pass it all the way. 3- secure the end and round the corners. 4- roll the ruffle 5- pin it though to keep it safe. |
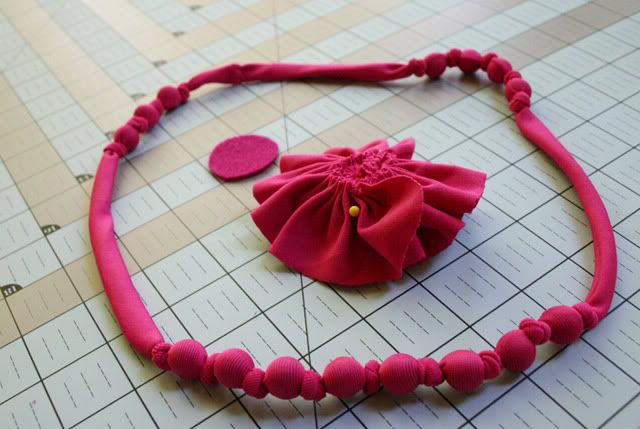 | Cut a small felt circle. |
 | Hot glue the flower to the necklace, glue the piece of felt on top. |
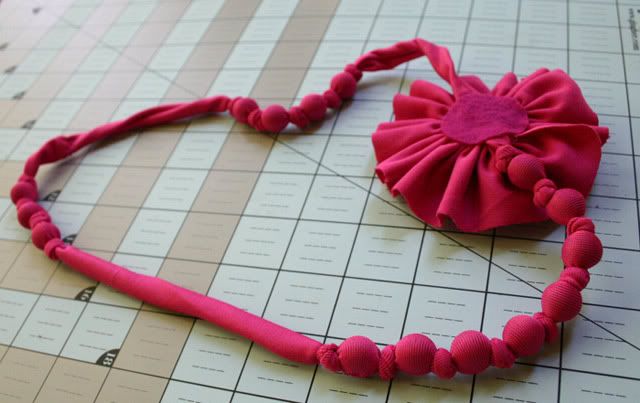 | You are done! |
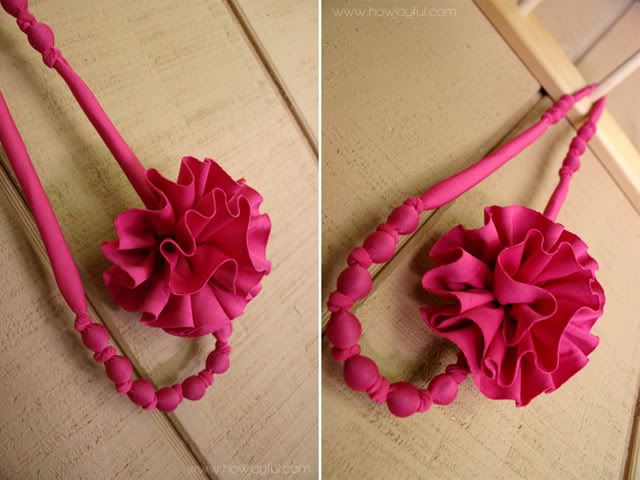
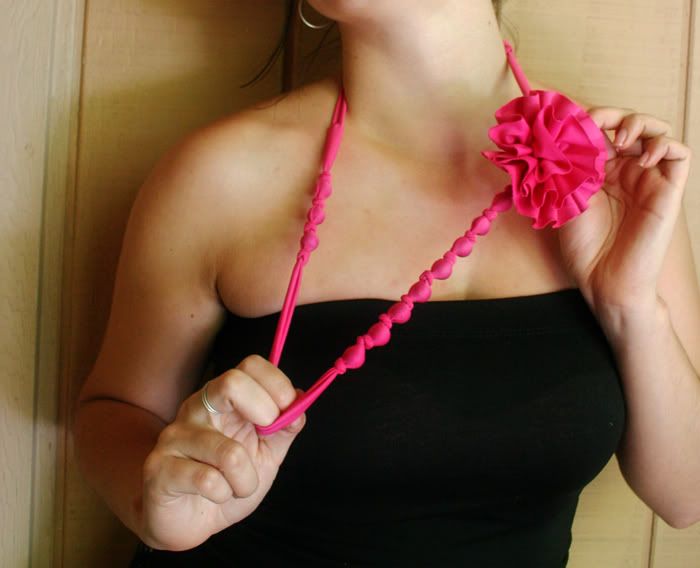
I love how simple and how cute it is! I could make one of each color to spice up my wardrobe
-----------------------------------------------------------------------
How to make a Placemat Purse

Materials Needed:
- 1 Fabric Placemat
- 1/2 yard of Lightweight Fabric for Lining
- 1/2 yard of Fusible Craft Interfacing (optional)
- Pair of Handbag Handles (wood, plastic, leather, etc.)
Transform a basic household placemat from a flat, two-dimensional table covering to a hip and imaginative fashion accessory. The wonderful thing about placemat purses is the sheer variety of materials available: ribbed cotton, vinyl, tapestry, microfiber, straw, faux leather, brocade, novelty weaves and more. Oval, rectangular and octagonal shapes create an instant variety of purse shapes to choose from.
Instructions:
Step 1. If the placemat requires a bit more body, cut fusible interfacing to the size of the placemat, less 1/2 ” all around. Center the interfacing over the wrong side of the placemat and fuse, following manufacturer’s directions. | |
Tip: If you want to add even more personality, you can embellish the placemat with appliqués, beads, embroidery or rhinestones. If you are sewing on your embellishments, the best time to do this is before attaching the lining, so all any stitching on the wrong side of the placemat will be covered by the lining. | |
Step 2. For handle tabs, cut four pieces of lining fabric, each measuring 3” long by 1 1/2” wide. Fold each piece in thirds, lengthwise; adjust the final width of the tabs to fit through handle rings. Stitch lengthwise through all thicknesses down the center of each tab. | |
Step 3. Slip a tab through each handle ring; with raw edges of the tabs even, stitch across the tabs 1/2” from raw edges. |  |
Step 4. Center each handle along the short sides of the placemat, with tabs against the wrong side of the placemat. Place tabs so that raw edges extend 1/2” in from edge of placemat. Stitch across tabs to attach them to placemat. Stitch again to reinforce. | |
Step 5. Cut lining fabric to the size of the placemat. Turn under 1/4” on all sides of the lining, and press in place. | |
Tip: To add a handy inside pocket or two, cut pocket(s) from the lining fabric, approximately 5” X 5” square. Turn under 1/2” on each side, and top stitch in place. Position the pocket on the right side of the lining as desired; sew along the sides and bottom of the pocket. | |
Step 6. Position the lining, right side up, over the wrong side of the placemat and covering extended edges of tabs. Stitch the lining to the placemat along all edges, close to the pressed edge of the lining. You can use either machine stitching or invisible hand stitches, depending on your preference. | |
Step 7-to Create a Purse with Squared-Off Corners: Fold placemat in half, with right sides together. Sew sides with a 5/8” seam allowance. To create the width at the bottom of the purse, flatten the bottom corners, centering the side seams. Turn handbag right-side-out, and you’re ready to go! |  |
Step 7 - to Create a Flat Purse with Pre-Bound Edges: For this style, use a placemat with pre-bound, finished edges. Fold placemat in half, with wrong sides together. Sew sides with a 1/2” to 5/8” seam allowance, depending on the width of the placemat binding, so that stitching is at the inner edge of the binding. | |
Tip: If desired, finish the purse with a closure of Velcro, a button and tab loop or handbag snap. | |
-----------------------------------------------------------------------
How-to Turn Old Jeans into a Sweet New Purse
first take out those old jeans hold them so they match up at the top and pin together.


now lay them on the table and smooth them out so the top part above the crotch is as flat as possible.

take your scissors and cut off the bottom half of the jeans making sure to cut off the beginning of the crotch area.


turn this part inside out line up the bottom and pin together.

using a running stitch sew a seam along the bottom then repeat in the opposite direction to enforce the seam.


Now square off both bottom edges by making a triangle shape


sew a sew from one side of your edge triangle to the other...be sure to do both edge triangles.


when you are done and the bag is turned right side out again it will look like this


now, take out your tape measure and measure the width of the inside back part of the bag body from one side to the other. stop your tape measure where the side fold begins.

take out one of your left over pant legs and rip apart one of the seams.

iron out all of the creases in the pant leg.

Use the measurement you just took and mark out your points on the pant leg. be sure that the seam in the pant leg that is still together, is in the center of the points you mark out.


Cut off the part of the pant leg that is above the points you marked out. make sure you don't cut to much. the bottom part is going to be the flap part of the purse. so make sure there is more than enough material to make your flap. then decided how much you need to cut off the top.


then fold in one of the sides starting at the mark you made and going down at a slight angle.


Iron a crease and pin. then do the same to the other side


now place the flap piece in the body of the bag to the point where it is going to be sewn later which in my case the was about 3 inches in.


fold the flap over the top part of the bag.

feel down to where the bottom of the bag ends and cut across about one inch below that point.


Next you are going to sew seams down the both sides of the flap and cut off the excess fabric.


now pin the flap to the back side of the inside of the bag.


Now sew the flap inside the bag using two seams. one along the top where the flap meets the bag. and one along the bottom where the beginning of the flap meet the bag.


now fold up the bottom hem of the flap pin and sew.


next take out that other left over pant leg and cut three equal strips that are as long as possible.


cut a hole in the side of the bag.


fold each of the three strips in half separately then place them together like so. and pull them through the hole.


tie a knot

braid the strips together very tightly.


after you have braided the strips almost to the end. make a hole in the other side of the bag.

pull the strips through and tie another knot.


and you are finito.
woop woop.
woop woop.
-----------------------------------------------------------------------
Tee Is for Tote
- Rate this craft
- Rated by 15 members
When your child outgrows her favorite shirt, turn it into a handy bag.- Materials
- Old T-shirt
- Scissors
- Needle and threat (or fusible bonding web, such as Super Weight Stitch Witchery)
- Fabric glue (optional)
- Instructions
 Cut off the shirt's sleeves, collar, and bottom as shown.
- Turn the shirt inside out and sew up the bottom hem (or close the seam with fusible bonding web). If you like, prevent the shoulder seams from unraveling by putting a few dots of fabric glue on each seam end. Turn the tee right side out, and it's ready to tote!
Tee Is for Tote

- Rate this craft
- Rated by 15 members
- Old T-shirt
- Scissors
- Needle and threat (or fusible bonding web, such as Super Weight Stitch Witchery)
- Fabric glue (optional)
- Cut off the shirt's sleeves, collar, and bottom as shown.
- Turn the shirt inside out and sew up the bottom hem (or close the seam with fusible bonding web). If you like, prevent the shoulder seams from unraveling by putting a few dots of fabric glue on each seam end. Turn the tee right side out, and it's ready to tote!
-----------------------------------------------------------------------
Backpack Shirt
Simple craft techniques give a T-shirt a second life 
Take the shirt off your back, and turn it into a bag you can wear — on your back! This project calls for an eyelet or grommet kit, which may require an adult's help to use.- Materials
- T-shirt
- Sharp scissors
- Needle and thread
- Large safety pin
- Clothesline cord, about 6 times the width of the shirt
- 7/16-inch eyelet (or grommet) kit (see tip below)
- Instructions
 Turn the T-shirt inside out, then cut across the shirt from armpit to armpit. You'll need only the bottom section.
 Use the needle and thread to sew a simple stitch across the shirt, about a half inch in from the cut edge, to seal what will be the bottom of the bag.
 Turn the shirt right side out. Snip the shirt's hem almost all of the way through (do not cut any stitching) at the midpoint between the two side seams. Attach a large safety pin to one end of the clothesline cord. Feed the cord, safety pin first, through the casing of the hem.
 Follow the eyelet or grommet kit instructions to add eyelets to the bottom corners of the bag.
 Thread the ends of the cord through the eyelet holes and double-knot them to secure.
- Tips:
- An eyelet or grommet kit can be purchased at craft stores or online for around $15. In a pinch, you can cut the holes with scissors and seal the cut edges with fabric glue, but the result won't be as neat or as sturdy.
Backpack Shirt
Simple craft techniques give a T-shirt a second life

- T-shirt
- Sharp scissors
- Needle and thread
- Large safety pin
- Clothesline cord, about 6 times the width of the shirt
- 7/16-inch eyelet (or grommet) kit (see tip below)
- Turn the T-shirt inside out, then cut across the shirt from armpit to armpit. You'll need only the bottom section.
- Use the needle and thread to sew a simple stitch across the shirt, about a half inch in from the cut edge, to seal what will be the bottom of the bag.
- Turn the shirt right side out. Snip the shirt's hem almost all of the way through (do not cut any stitching) at the midpoint between the two side seams. Attach a large safety pin to one end of the clothesline cord. Feed the cord, safety pin first, through the casing of the hem.
- Follow the eyelet or grommet kit instructions to add eyelets to the bottom corners of the bag.
- Thread the ends of the cord through the eyelet holes and double-knot them to secure.
-----------------------------------------------------------------------
Juice Pouch Purses
By Jennifer Slaugh, senior staff writerI’ve seen them on eBay, on BYU campus, and all around at pools this summer—the latest and greatest in satchel style. The juice pouch purse is the perfect accessory for several reasons. First, you can make it at home in less than an hour (less than half an hour after you’ve made a few.) Second, you can choose from a wide variety of colors for the purse and its embellishments. And third, it’s waterproof. What’s not to like about that? All this fun and style, and the cost is less than $5!I was pleasantly surprised with how easy this purse was to put together. I learned the hard way on my first attempt that not all assembly sequences are equal and have given you the sequence that made assembly easiest. These directions are for a purse that is two pouches wide and one pouch deep. I used a zigzag stitch for all seams except on the handles. I used a white thread, but you can use any thread that matches the bag you are sewing.
Supplies:
• 10 juice pouches
• Thread in any color that will match your pouches
• Optional: trims or embellishments
Step-by-step:Preparing the Juice Pouches1. Empty juice pouches. I used a sharp knife to cut a slit in the bottom of each pouch (SEE FIGURES 1 & 2). I emptied the juice into a picture to drink later. If you have children around that will drink the juice, have them poke the straw in through the bottom of the pouch and make the full slit with they are finished. Having a larger opening makes rinsing out the pouch easier.

FIGURE 1
FIGURE 2
2. Wash each pouch in warm, soapy water. 3. To dry the pouches, I started by throwing them in the dryer for 20 minutes. That didn’t get them completely dry, so I set them outside in the sun for a while and then inside in front of a fan for a while. I recommend letting them dry overnight. Make sure that you have the pouches opened so that air will dry out the inside. Wait until the pouches are completely dry before beginning the sewing. 4. Flatten all pouches. Front and Back:5. To make the front, lay two juice pouches side by side, graphic-side up (SEE FIGURE 3). Overlap them about 1/4 inch and sew with a zig zag stitch (SEE FIGURE 4). (Note, it looks prettier to sew on the top than the underneath side.) Repeat with two additional bags for the back side of the purse.

FIGURE 3
FIGURE 4
Handles:6. Place two more pouches head to head, graphic-side up. Overlap tops and sew together. (Note, sewing them this way, makes the part of the handle you see, the part with the most color.) Cut in half lengthwise. Fold each piece into thirds lengthwise and straight stitch down each side (SEE FIGURES 5 & 6).

FIGURE 5
FIGURE 6
7. Attach one handle to the purse front and purse back with a zigzag stitch (SEE FIGURES 7 & 8).

FIGURE 7
FIGURE 8
Bottom:8. Using the purse front piece as a guide, overlap two pouches lengthwise to match the width of the front panel. Zigzag to hold the two pouches together (SEE FIGURES 9 & 10).

FIGURE 9
FIGURE 10
Sewing Sides to the Bottom:9. Lay the bottom graphic-side down, so that the silver-side is up. The side panels of the purse are easy, they are just one pouch each. So there's no sewing to make the side panels.10. To attach the side panels to the bottom, lay one side panel (one pouch) graphic-side up on top of the bottom panel. Match up the edges, so that the bottom-end of the side panel lines up with one edge of the bottom piece. Zigzag together to create an exposed seam (SEE FIGURE 11).

FIGURE 11
11. Repeat step #10 to attach the other side panel. With both, make sure the side panels will have the graphic right-side-up when purse is finished. At this point you will have three purse pieces:
(1) Side panels attached to the bottom panel
(2) Front-side with handle
(3) Backside with handleConnecting the Purse:12. Placing wrong sides together, attach the graphic-side of the purse front to one of the side pieces using a zigzag stitch. Be sure to leave 1/4 inch open at the bottom. If you sew all the way to the bottom of the bag you will not be able to attach the bottom piece easily.13. Attach the other side panel to the graphic-side of the backside of the purse, again leaving 1/4 inch open at the bottom. You should now have all the pieces connected in a sort of “z” shape (SEE FIGURE 12).

FIGURE 12
14. Fold the purse into shape and attach the left-side of the purse front to the other side panel, leaving 1/4 inch open at the bottom. Attach the left-side of the purse back to the other side panel, again leaving 1/4 inch open at the bottom. The purse front and back pieces are NOT attached to the bottom at this point (SEE FIGURE 13, as you can see silver opening from the bottom open seam).

FIGURE 13
Finishing the Bottom:15. Attach the purse front to the bottom with a zigzag stitch. You might need to fold the purse (the same way a brown paper sack folds at the bottom -- SEE FIGURE 14) to make it easier to sew.16. Repeat with purse back panel. If you sew from edge to edge you will seal up the 1/4-inch allowance left when attaching the side panels to the front and back panels. Closing the panels this way leaves an attractive finish (SEE FIGURE 15).

FIGURE 14
FIGURE 15
The bag is complete! (SEE FIGURE 16)

FIGURE 16
Embellishments:17. You could use the purse as it is, but you could also add rickrack, fringe, ribbon, buttons, or feathers to add some sass to the top-edge of the purse (SEE FIGURES 17 & 18). I used hot glue to attach mine and discovered that it doesn’t hold to the juice pouches very well. You will either need to use a lot of glue or actually stitch the embellishment to the purse.

FIGURE 17
FIGURE 18
Variations:You can adjust the size of the purse easily by purchasing the jumbo sized juice pouches. I have also seen juice pouch purses that are square (one pouch wide on all sides), and purses that are much taller tote-bag-like (four pouches make up the front panel—two wide and two tall). Another easy way to personalize your purse is to change the material of the handles. You could use heavy ribbon, belting material, or handles made from coordinating fabric. I have even seen purses with clear plastic tubing filled with glitter, confetti, and colored salt sew on for handles. With a little creativity, the options are endless!
Juice Pouch Purses
By Jennifer Slaugh, senior staff writer
By Jennifer Slaugh, senior staff writer
I’ve seen them on eBay, on BYU campus, and all around at pools this summer—the latest and greatest in satchel style. The juice pouch purse is the perfect accessory for several reasons. First, you can make it at home in less than an hour (less than half an hour after you’ve made a few.) Second, you can choose from a wide variety of colors for the purse and its embellishments. And third, it’s waterproof. What’s not to like about that? All this fun and style, and the cost is less than $5!
I was pleasantly surprised with how easy this purse was to put together. I learned the hard way on my first attempt that not all assembly sequences are equal and have given you the sequence that made assembly easiest.
These directions are for a purse that is two pouches wide and one pouch deep. I used a zigzag stitch for all seams except on the handles. I used a white thread, but you can use any thread that matches the bag you are sewing.
| Supplies: • 10 juice pouches • Thread in any color that will match your pouches • Optional: trims or embellishments Step-by-step: Preparing the Juice Pouches 1. Empty juice pouches. I used a sharp knife to cut a slit in the bottom of each pouch (SEE FIGURES 1 & 2). I emptied the juice into a picture to drink later. If you have children around that will drink the juice, have them poke the straw in through the bottom of the pouch and make the full slit with they are finished. Having a larger opening makes rinsing out the pouch easier.
2. Wash each pouch in warm, soapy water. 3. To dry the pouches, I started by throwing them in the dryer for 20 minutes. That didn’t get them completely dry, so I set them outside in the sun for a while and then inside in front of a fan for a while. I recommend letting them dry overnight. Make sure that you have the pouches opened so that air will dry out the inside. Wait until the pouches are completely dry before beginning the sewing. 4. Flatten all pouches. Front and Back: 5. To make the front, lay two juice pouches side by side, graphic-side up (SEE FIGURE 3). Overlap them about 1/4 inch and sew with a zig zag stitch (SEE FIGURE 4). (Note, it looks prettier to sew on the top than the underneath side.) Repeat with two additional bags for the back side of the purse.
Handles: 6. Place two more pouches head to head, graphic-side up. Overlap tops and sew together. (Note, sewing them this way, makes the part of the handle you see, the part with the most color.) Cut in half lengthwise. Fold each piece into thirds lengthwise and straight stitch down each side (SEE FIGURES 5 & 6).
7. Attach one handle to the purse front and purse back with a zigzag stitch (SEE FIGURES 7 & 8).
Bottom: 8. Using the purse front piece as a guide, overlap two pouches lengthwise to match the width of the front panel. Zigzag to hold the two pouches together (SEE FIGURES 9 & 10).
Sewing Sides to the Bottom: 9. Lay the bottom graphic-side down, so that the silver-side is up. The side panels of the purse are easy, they are just one pouch each. So there's no sewing to make the side panels. 10. To attach the side panels to the bottom, lay one side panel (one pouch) graphic-side up on top of the bottom panel. Match up the edges, so that the bottom-end of the side panel lines up with one edge of the bottom piece. Zigzag together to create an exposed seam (SEE FIGURE 11).
11. Repeat step #10 to attach the other side panel. With both, make sure the side panels will have the graphic right-side-up when purse is finished. At this point you will have three purse pieces: (1) Side panels attached to the bottom panel (2) Front-side with handle (3) Backside with handle Connecting the Purse: 12. Placing wrong sides together, attach the graphic-side of the purse front to one of the side pieces using a zigzag stitch. Be sure to leave 1/4 inch open at the bottom. If you sew all the way to the bottom of the bag you will not be able to attach the bottom piece easily. 13. Attach the other side panel to the graphic-side of the backside of the purse, again leaving 1/4 inch open at the bottom. You should now have all the pieces connected in a sort of “z” shape (SEE FIGURE 12).
14. Fold the purse into shape and attach the left-side of the purse front to the other side panel, leaving 1/4 inch open at the bottom. Attach the left-side of the purse back to the other side panel, again leaving 1/4 inch open at the bottom. The purse front and back pieces are NOT attached to the bottom at this point (SEE FIGURE 13, as you can see silver opening from the bottom open seam).
Finishing the Bottom: 15. Attach the purse front to the bottom with a zigzag stitch. You might need to fold the purse (the same way a brown paper sack folds at the bottom -- SEE FIGURE 14) to make it easier to sew. 16. Repeat with purse back panel. If you sew from edge to edge you will seal up the 1/4-inch allowance left when attaching the side panels to the front and back panels. Closing the panels this way leaves an attractive finish (SEE FIGURE 15).
The bag is complete! (SEE FIGURE 16)
Embellishments: 17. You could use the purse as it is, but you could also add rickrack, fringe, ribbon, buttons, or feathers to add some sass to the top-edge of the purse (SEE FIGURES 17 & 18). I used hot glue to attach mine and discovered that it doesn’t hold to the juice pouches very well. You will either need to use a lot of glue or actually stitch the embellishment to the purse.
Variations: You can adjust the size of the purse easily by purchasing the jumbo sized juice pouches. I have also seen juice pouch purses that are square (one pouch wide on all sides), and purses that are much taller tote-bag-like (four pouches make up the front panel—two wide and two tall). Another easy way to personalize your purse is to change the material of the handles. You could use heavy ribbon, belting material, or handles made from coordinating fabric. I have even seen purses with clear plastic tubing filled with glitter, confetti, and colored salt sew on for handles. With a little creativity, the options are endless! |
-----------------------------------------------------------------------
Make Pillowcase Dresses

Peaches won't let me touch her hair. She likes it wild. No brushing. No Clips. No pig tails. In the first shot, her face gives away her opinion of dresses. The second shot is post marshmallow bribery.

Usually a pillowcase dress refers to a dress cut from a pillowcase. Since I didn't have a cute enough pillowcase to cut for a dress, I improvised. And so can you.
Materials
- Sewing machine
- 1/2 yard of fabric
- Matching thread
- Bias tape

Place a onesie on top of a piece of fabric (I used cotton) and fold like the picture above. Cut the fabric into a rectangular shape (like a pillowcase). You want a 1.5" to 2" margin on all sides of the onesie.

Without moving the onesie, locate the armpit and make a small snip in the fabric. Do the same for the shoulder.

Create two arm holes by cutting a curved line from the armpit snip to the shoulder snip. You should have two identical pieces like the picture above, one for the front and one for the back.

To create the armholes, fold the edges under (toward the wrong side of the fabric) two times and pin in place. Folding twice gives it a pretty finish. Sew it together, removing each pin before sewing over.

Create the neckline by folding the top of the neck under two times, pin in place, and sew. Fold the neckline under again one time. This time fold it down 1.5 inches, pin in place, and sew. Repeat this for both the front and back sides of the dress.

Place the front and back sides together wrong side out. Pin along the sides and sew with a 1/4" allowance.

To hem the bottom of the dress, fold the edge under twice, pin in place, and sew.

Turn the dress right side out and press with an iron.

The ties can be made several ways: ribbon, plain fabric, etc. But, I chose to use extra wide double fold bias tape because I had some on hand. There's a picture of bias tape above if you don't know what it is. You can also make your own bias tape, but that's a different lesson.

Cut 2 – 24 inch lengths of bias tape. Open the bias tape, fold under the end, and fold it closed again. Sew lengthwise along the open edge like the last picture above.

Insert the bias tape through the neck loops.

For the bottom ruffle, cut a 3" wide x 30" long piece of fabric (I used cotton here, too). Fold all edges under two times and sew just like on the dress above.

Set the sewing machine to the longest stitch length. Sew lengthwise on one edge leaving excess thread for pulling. Do NOT backstitch. Backstitching will prevent you from being able to bunch the fabric. Hold on to one end of the thread and gently bunch the fabric until it matches the length of the circumference of the bottom of the dress. Match up the bottom of the dress with the top of the ruffle. Pin in place on the wrong side of the dress and sew (with a regular stitch length).
And there you have it! A makeshift pillowcase dress.
-----------------------------------------------------------------------
I have seen a lot of inquirers on how to make tutus, etc. so I brought over some information frommy site to share with y’all!
This is the one I made~ Make sure you scrunch your tulle together really well to have a really full tutu! I use about 20 yards of tulle in each of mine.

To measure your waist, make sure you measure your model and then take off about 2-3 inches of elastic. I know that sounds drastic, but as you put on the tulle and tighten it, it stretches the elastic out and makes it bigger..so if you don’t take down the waist size before, your waist will end up really big and you will be taking it half apart. Trust me, I did it twice.
On elastic size, that’s preference. I find with older girls, the 1 inch is a good size, but for the babies, you may want something less wide like a 3/4th inch elastic. They cost about $1.20 atwalmart.
To add to these instructions since it isn’t listed in a lot of places, 6 inch tulle works really well, not the big tulle you find on the bolts. I use the big tulle on the bolts, so I end up having to cut in a lot of ways to get it to be not to thick. If you go that route, you generally have to cut the length and width.

Premeasure your tulle out and have it all ready so you can basically go from start to finish. A general rule is that it should be about 22-24 inches in length so when you fold it in half, it hangs long enough. If you measure out 24 inches, it will be 12 inches in length. So basically half your length to determine how long the skirt is. I do all the trimming at the end so I dont worry so much.
Where you did the sewing will be a little hard to close the last few pieces of tulle over the top. I always put an embellishment in that area to cover up any discrepancy.

TIP: Instead of Elastic, you can use big satin ribbon and the just tie in a bow. Its easy removal…but that’s half the problem…your child, especially if you have a young one, can remove it. Elastic is a lot more snug.
Some Halloween Ideas for Tutus:
- Red Tulle with Black Puff Balls glued on Make a LadyBug
- Orange, Purple, and Black tulle for a witch
- Yellow, Orange, White for Candy Corn
- Hot Pink and Lime Green for Strawberry Shortcake
- White and Light Pink for a “50′s” Look
- Purple and Light green for a Fairy
- Yellow and Black for a Bumble Bee
Make sure you add some embellishments like sparkles or pom poms when your done! I added flowers to mine!

Other Embellishments include things like Satin Ribbons, Rhinestones, Puff Balls, Flowers, Rose petals, or small premade ribbons that you can find at Micheal’s or Hobby Lobby.
I use hot glue.
-----------------------------------------------------------------------
Burlap Flower Tutorial
Follow Along... :)
Start by cutting a 5" square piece of burlap.


Fold the square in half from point to point, making a triangle.

Fold the triangle in half.


Fold the triangle in half again.
{Not too complicated so far...}


With the closed end of the triangle pointed down and the open end up, cut the triangle into an "ice cream cone" shape.


{Does that look like an ice cream cone???}
Open the "ice cream cone" to see the flower...

Repeat this process with coordinating fabric.

For the rest of this project you will need...

small rubberbands

double sided mounting dots
&

a small, round "gem" or pretty much anything small & round!
NEXT...
Stack the flowers face down on top of each other. Attach one side of the sticky dot to the top of the gem and the other side of the dot to the flower.
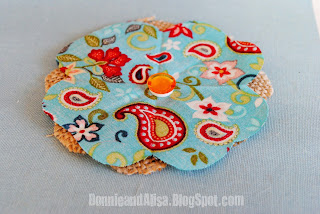
Pull the fabric up around the gem and secure it with a rubber band.

Spread the flower out around the rubber band.

Hot glue twine around the center of the flower starting at the base of the rubber band. The hot glue may melt the rubber band so work quickly!

Snip off the excess twine.

The End.

Check Out...-----------------------------------------------------------------------How To Make A T-Shirt Fabric Flower: Tutorial Time!

Follow Along... :)
Start by cutting a 5" square piece of burlap.


Fold the square in half from point to point, making a triangle.

Fold the triangle in half.


Fold the triangle in half again.
{Not too complicated so far...}


With the closed end of the triangle pointed down and the open end up, cut the triangle into an "ice cream cone" shape.


{Does that look like an ice cream cone???}
Open the "ice cream cone" to see the flower...

Repeat this process with coordinating fabric.

For the rest of this project you will need...

small rubberbands

double sided mounting dots
&

a small, round "gem" or pretty much anything small & round!
NEXT...
Stack the flowers face down on top of each other. Attach one side of the sticky dot to the top of the gem and the other side of the dot to the flower.

Pull the fabric up around the gem and secure it with a rubber band.

Spread the flower out around the rubber band.

Hot glue twine around the center of the flower starting at the base of the rubber band.
The hot glue may melt the rubber band so work quickly!

Snip off the excess twine.

The End.

Check Out...
For my birthday two summers ago, I got a lovely little gift card to Anthropologie, and treated myself to two hair clips that looked like these:

They were a bit pricey, as Anthro stuff tends to be-- $15 apiece, and after months of wearing them and pondering them and KNOWING I could make them myself somehow, I finally took some time to actually dissect the flower (not LITERALLY, but close! I poked and prodded that thing until I was SURE it'd fall apart!), and I came up with a reasonably similar version.
This tutorial is going to share that process with you, so you can make a flower that looks like THIS:

Pretty close, right? Cute!
paper to make a template
scissors
straight pins
felt in a matching or complimentary color
glue (I use either Tacky Glue or hot glue)
hair accessory to complete the flower (headband, clip, pin)
T-Shirt Fabric Flower Supply List
1/4 + yard of t-shirt fabric, also called cotton knit interlockingpaper to make a template
scissors
straight pins
felt in a matching or complimentary color
glue (I use either Tacky Glue or hot glue)
hair accessory to complete the flower (headband, clip, pin)
*
So to begin, you will need a little bit of t-shirt fabric. You can use an old t-shirt you actually have, or you can go to the fabric store and get some cotton knit interlocking (the official name of this fabric). Ask your friendly fabric store employee for help if you're a fabric store rookie. You can get by with 1/4 yard if you only want to try this out with one or two flowers. Or you can get more if you are feeling ambitious and want to make several.
You'll also need some felt and some kind of hair clip, pin, headband, etc.
Step One:
Make a flower template. This doesn't have to be super precise, but is should have 5-6 petals. You can see I just used scrap paper. My flower is approx. 3"-3.5" across.
(P.S. Ew, gross-- forgive my dingy college-era mini-ironing board that is the backdrop for these photos. It is old and not-so-pretty. I apologize!)
(P.S. Ew, gross-- forgive my dingy college-era mini-ironing board that is the backdrop for these photos. It is old and not-so-pretty. I apologize!)

Step Two:
Cut a stack of these flowers. Some of you might want to trace the template... But I am lazy and HATE pen lines, so I just stacked my fabric two layers deep and cut around the template while it was pinned. You need nine total flowers, though this stack shows 11 (can't have too many extras, right??).

Step Three:
Cut a felt circle in a coordinating or complimentary color, about 2.5" or 3" across.Take your first flower and fold it in half.

And then in half again.

Do this with your first four petals, and arrange them so their corners all meet in the center of the felt circle.


Step Four:
You can do the assembling in one of three ways. I've done all three, and truly have no preference. You can use:1. Tacky Glue
2. Hot glue gun
3. Thread
In this tutorial, you'll see both glue techniques.
Glue the petals onto the felt. Then glue the folded flap to itself. (This pic shows Tacky Glue).

Step Five:
Now fold four more petals the same way, and glue them in a second layer, but semi-perpendicular to the first layer. Okay, too hard to explain, let me show you. (This pic shows glue gun glue). Add all four petals onto the layer this way, and once again glue the top flap of the folded petal to itself.
Step Six:
Fluff up your two-layered flower to begin seeing what the final product will look like.
See the sides? Lots of fun texture from the multiple folds and layers!

Step Seven:
Now for the center. Take a petal and fold it in half. This time, instead of folding it again, you are going to roll it into a sort of cone, with the fold being the narrow part of the cone and the petals being the wide part:
You're making a rosebud type of effect, shown here:

Step Eight:
I actually trimmed about 1/2" off of the bottom of this rosebud cone, but you don't have to. You then GOB it with glue (perhaps hot glue is best here, or thread. Tacky Glue might not hold this last petal well enough for you to wait for it to dry)... And place the rosebud, bottom tip down, into the center of your flower.(I'm mushing it down in there pretty hard, if you can't tell.)

Step Nine:
We need to fluff up this flower in a more permanent way now, otherwise you'll have two flat layers and a sticking-up rosebud. So we are going to attach parts of the top layer of petals to the rosebud, to bring up the petals to the same level as the rosebud. Like this:Glue dots in place:

Petals now attached to rosebud:

Step Ten:
If you want, you can do this gluing petals to each other thing in other places to bring more body to the flower, or you can call it good just the way it is.If you are ready to finish, you just need to attach your preferred hair accessory to the felt circle on the back.
Headband: If you want this to go on a headband, cut another felt circle and use a glue gun to glue the flower on top of the headband. Ring the second felt circle with glue and attach it to the first felt circle, with the headband sandwiched between. Don't be skimpy with the glue!
Hair Clip: Sew or glue your clip onto the flower back, centered on your felt circle.
Pin: Sew the pin onto the back, centered on your felt circle.
*
And VOILA! You have your own Anthropologie-style T-Shirt Fabric Flower! The fabric won't fray, and the color will stay fresh, and you'll be hip and ready to go!
Ta da!
-----------------------------------------------------------------------
Felt Flower Tutorial
Have you ever looked at cute flower brooches in boutique stores and thought, “I could do that!” ?
Well, I do, all the time. I recently was perusing Etsy and came across some adorable felt flowers. I was enamored, so cute! Think of their many uses! Then I looked at the price: $30! Forget that, I’m going to make them myself!
Felt Flower Tutorial
Start with a sheet of felt, whatever color you prefer.

I should warn you ahead of time, yes that is a cutting board, and yes those are my pajamas, and yes I’m sitting cross-legged on the couch on a Saturday morning. Some of the best crafting takes place in these conditions!
Now, cut a scalloped strip out of the felt. I used a pen to mark the tops of my bumps so that they would be relatively even. I spaced them about an inch or so apart.
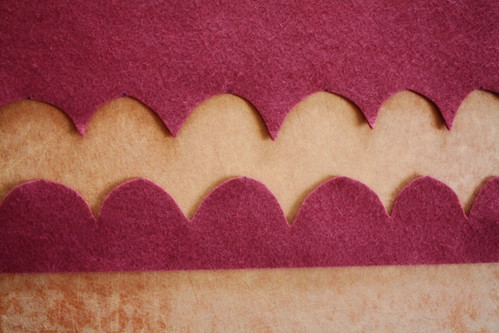
Ta da!
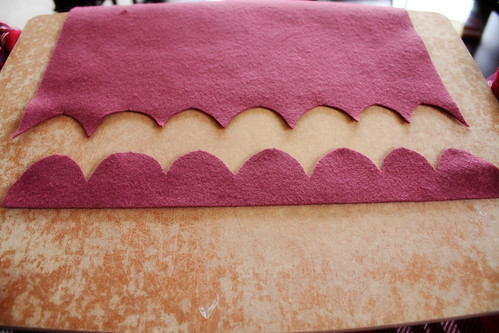
Then, grab a needle and some thread of the same/approximate color as your felt.
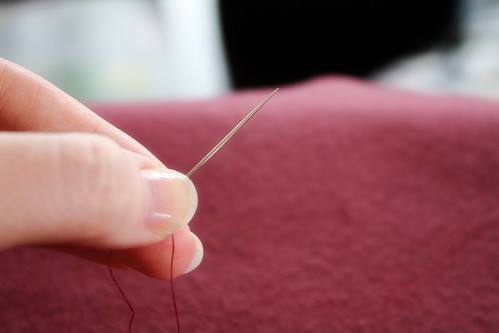
Tie a knot at the end of the thread, and start making relatively big stitches starting on one side of the scalloped felt, like this:
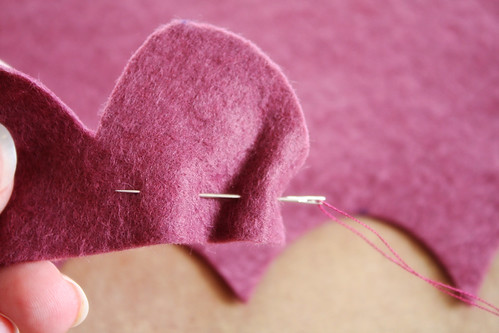
You’ll notice as you start to pull the thread through, the felt starts to fold up on itself and will begin to curl.

Pull it tight, and secure the ends together. So pretty!
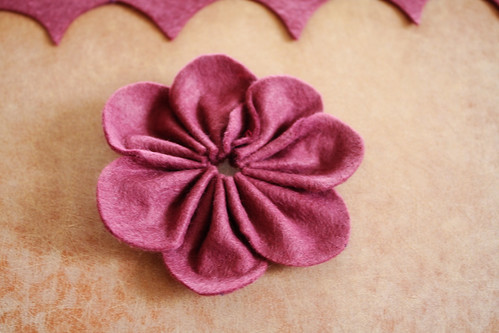
But we’re not done! Well, you could be. It would be very pretty as a flower by itself, but you could also keep going!
Grab the felt and cut out another, smaller scalloped strip.
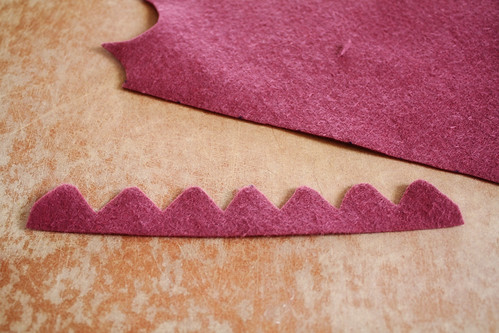
Stitch through the base like we did the original flower, and sew together the ends.
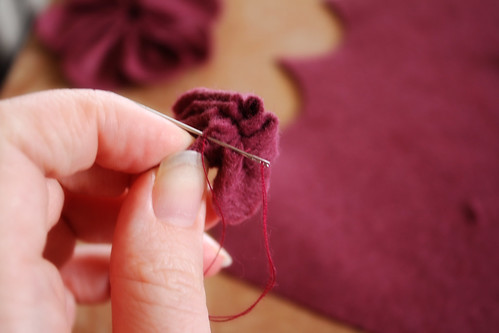
Good! Now tack the smaller flower into the center of the larger flower. I chose to then cut a tiny little circle for the very center of the flower, and stitch in place. Then you’re done!
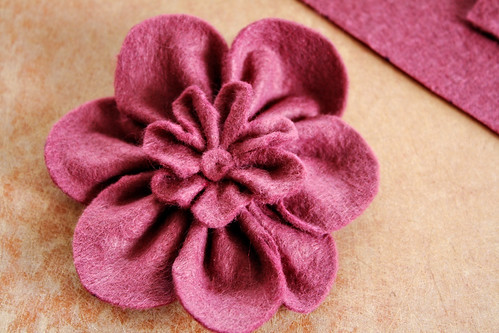
So cute! You can tack it on anything now. Put it on a purse, sew it to a headband, lots of possibilities! I like to tack it to a safety pin so I can move it all around. Also you can have fun and do different shades for the different layers of the flower. The possibilities are endless!

Well, I do, all the time. I recently was perusing Etsy and came across some adorable felt flowers. I was enamored, so cute! Think of their many uses! Then I looked at the price: $30! Forget that, I’m going to make them myself!
Felt Flower Tutorial
Start with a sheet of felt, whatever color you prefer.
I should warn you ahead of time, yes that is a cutting board, and yes those are my pajamas, and yes I’m sitting cross-legged on the couch on a Saturday morning. Some of the best crafting takes place in these conditions!
Now, cut a scalloped strip out of the felt. I used a pen to mark the tops of my bumps so that they would be relatively even. I spaced them about an inch or so apart.
Ta da!
Then, grab a needle and some thread of the same/approximate color as your felt.
Tie a knot at the end of the thread, and start making relatively big stitches starting on one side of the scalloped felt, like this:
You’ll notice as you start to pull the thread through, the felt starts to fold up on itself and will begin to curl.
Pull it tight, and secure the ends together. So pretty!
But we’re not done! Well, you could be. It would be very pretty as a flower by itself, but you could also keep going!
Grab the felt and cut out another, smaller scalloped strip.
Stitch through the base like we did the original flower, and sew together the ends.
Good! Now tack the smaller flower into the center of the larger flower. I chose to then cut a tiny little circle for the very center of the flower, and stitch in place. Then you’re done!
So cute! You can tack it on anything now. Put it on a purse, sew it to a headband, lots of possibilities! I like to tack it to a safety pin so I can move it all around. Also you can have fun and do different shades for the different layers of the flower. The possibilities are endless!
-----------------------------------------------------------------------

These elegant fabric flowers are very simple to make . . . and only take a few basic supplies. The finished product is delightfully lovely, and at times can look like a real flower! Every flower will turn out differently and that is part of the beauty!
If you haven’t used those tea lights in a while, now’s the time! I hope you enjoy making these as much as we do . . . below are instructions with pictures on how to make your own.
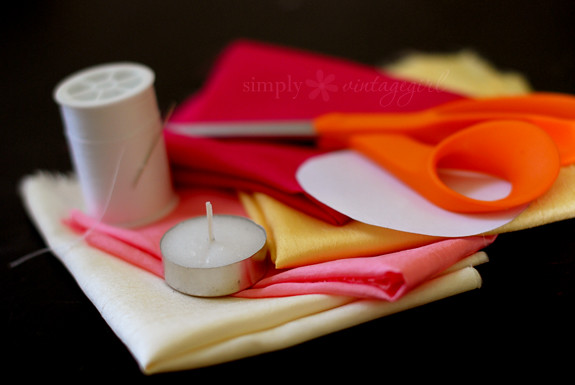
Supplies:
· Synthetic Silky Fabric
· Scissors
· Candle (preferably a tea light)
· Scissors
· Candle (preferably a tea light)
Additional supplies:
· Needle and Thread, Glue Dots or Glue Gun
· Buttons and/or Beads
· Buttons and/or Beads
Directions:
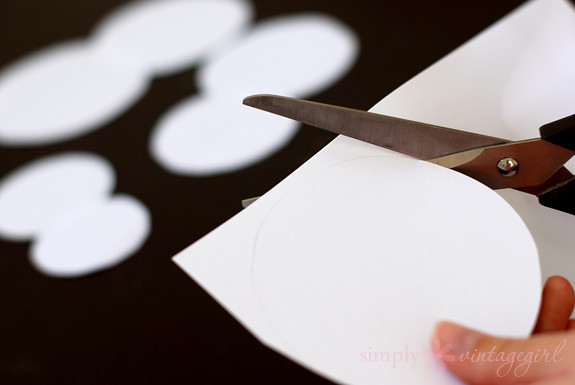
1. Cut circle patterns out of card stock.
Make the largest one’s diameter about half an inch larger than you want the diameter of the flower, as the petals will end up shrinking a bit. Create a few of these, lessening the diameter bit by bit so that the end result has smaller petals in the center and larger ones around the outside. You can also use a pattern here, which works very nice!
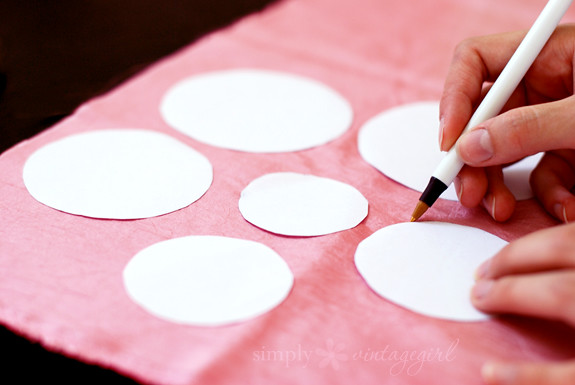
2. Trace around the pattern onto the silk fabric (using a pen).
You can also cut around the pattern and skip the drawing part, it just might not be as uniform . . . but with these, uniform isn’t necessary. And if it’s not uniform, it adds character. And character is good.
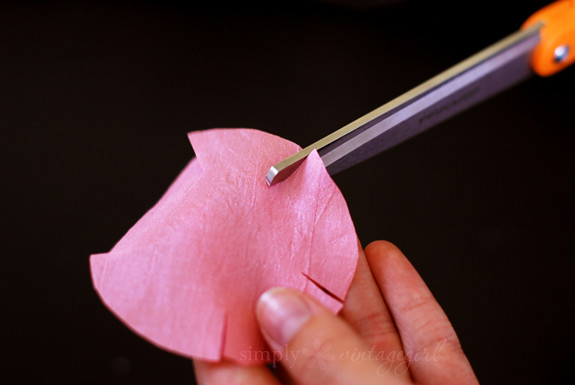
3. Take the scissors and cut out the circle and petals.
Cut just inside the drawn lines to make a circle out of the fabric. Carefully cut only about a third of the way into the circles to create the petals. You can do as many or few petals as you would like, or even add some variety to them. I cut five times, making five medium-sized petals. You can also round the corners of the petals, if you so desire.
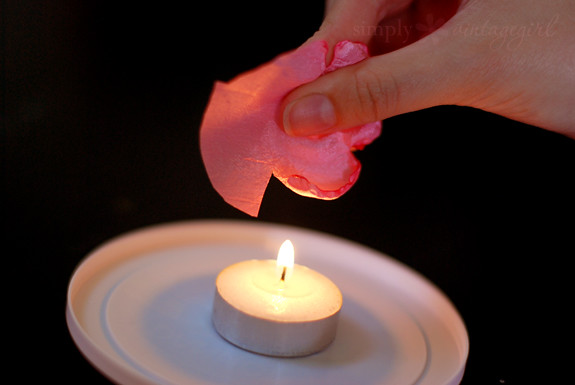
4. Use the lit candle to melt and crinkle the edges.
Be very careful (please have adult supervision, this is rather dangerous), as it is very easy to get burnt. Hold the cut petals about one to two inches above the flame, making sure to keep the circle rotating so that it does not overheat and catch fire. Continue to gently melt the edges of each petal until you have gone all the way around. Do this with each layer.
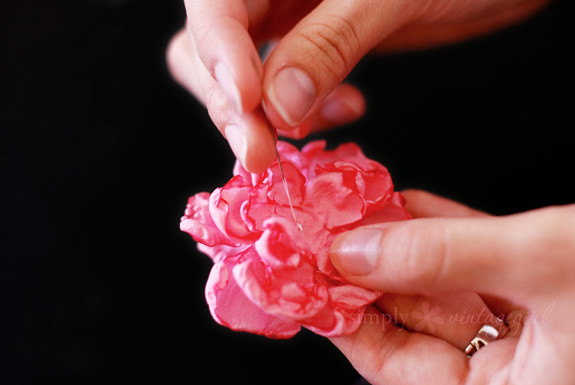
5. Sew (or glue) the petal layers together.
Using a needle and thread, create a beginning knot and then sew the layers together. You can come up through the top because the center of the top layer can be covered by a button or bead. To finish the flower, sew (or glue) the button or bead on top.
If you would like to add extra stability to the flower, you can sew or glue a piece of felt onto the back (make sure it is large enough to give good stability, but small enough so that it won’t be seen from the top).
I Got all the stuff above from a lot of different blogs and places hope you like them;)-----------------------------------------------------------------------
Hi there, If you like to cook here are some clever places you may find some great recipes from allrecipes.com and thegirlwhoateeverything.blogspot.com hope you like them as much as I do.
-----------------------------------------------------------------------
I'm having so much fun using Picnik.com Its the best thing to use for editing pictures. It's free, and easy to figure out. It is especially fun if you have uploaded to premium (which is not free but has a very good price considering all of the extra neat thing you can do to your pictures) hope you enjoy it!